
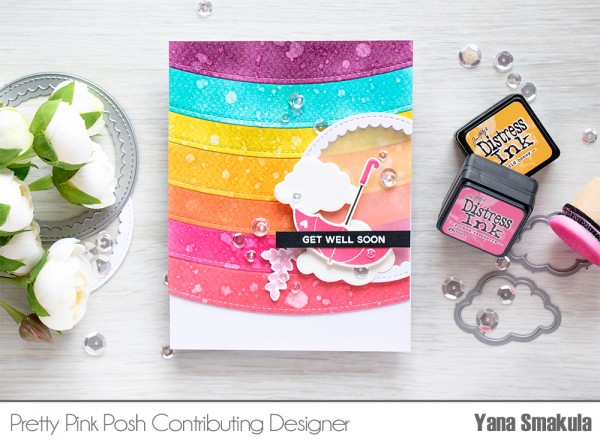
Tutorial: Die Cut Rainbow Background
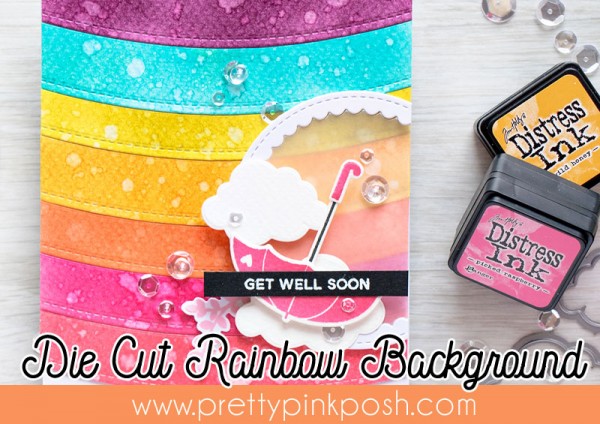
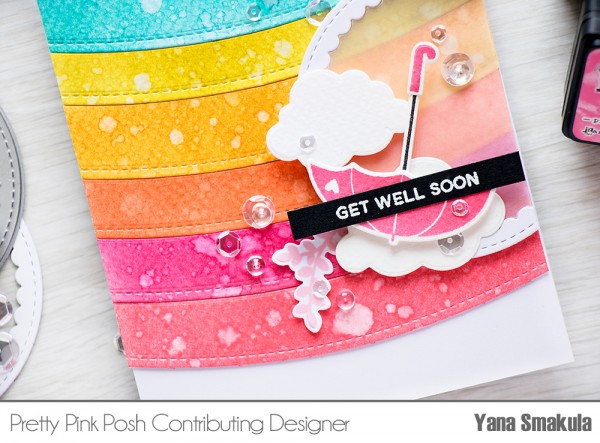
Hello, Pretty Pink Posh fans! This is Yana and I have a Get Well card with a DIY rainbow die cut background to share today.
I love to create unique and one of a kind backgrounds for my cards and I find dies to be great tools for this task. Today I’m inviting you to use one of the Pretty Pink Posh border dies to create a rainbow background.
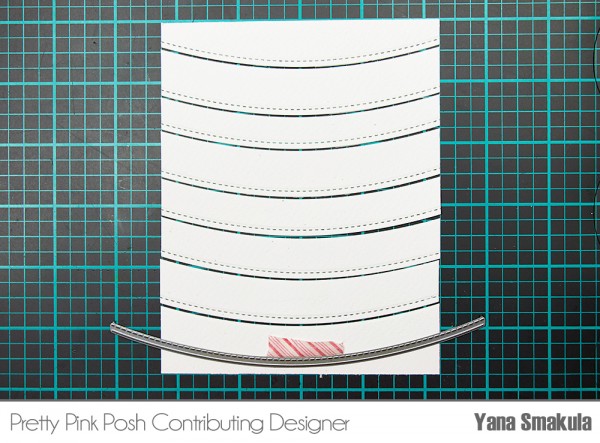
To minimize the use of supplies (such as watercolor paper) and time I first cut a rectangle out of watercolor paper (I knew I wanted to use distress inks and add a lot of water, so I needed my paper to be able to absort water and not warp) and using a border die from the Stitched Borders 1 set cut the panel into 8 curved sections.
The number of sections was not random, I knew I wanted to have a background that resembled a rainbow, so I needed to make sure to have 7 die cut elements, the 8th one, the one on the bottom was discarded as I planned to have a bit of white space on the base of the card. If you don’t want any white space and would rather have the rainbow cover the entire card front, go with 7 sections.
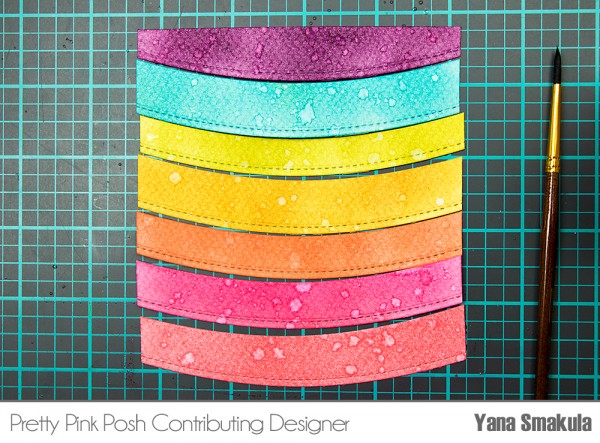
The next step is all about adding color to the die cut pieces. There are a number of ways this can be done depending on the look you’d like to get. I went with Distress inks (the colors I used are: Worn Lipstick, Picked Raspberry, Ripe Persimmon, Wild Honey, Crushed Olive, Peacock Feathers and Seedless Preserves). You can also use watercolors, alcohol markers, ink pads or even die cut individual sections out of colored cardstock.
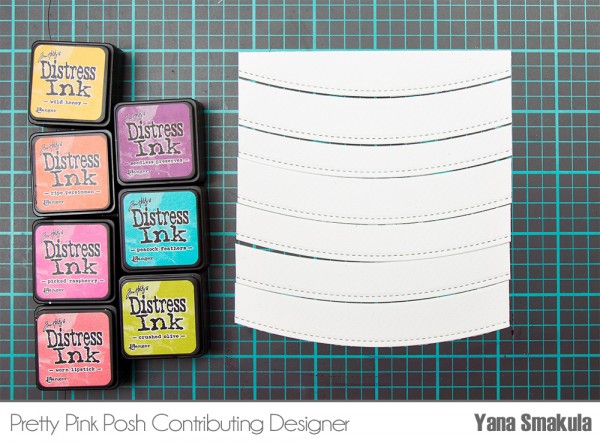
Colors shown: Worn Lipstick, Picked Raspberry, Ripe Persimmon, Wild Honey, Seedless Preserves, Peacock Feathers, Crushed Olive
After blending each color rather heavily onto the paper, I added lots of water drops to activate Distress inks and create beautiful effects on my background. I worked in layers – added a first layer of drops, let the water sit on the paper for about a minute, soaked up extra water with a rag, dried the paper with my heat tool and repeated the process a few more times to get the look I wanted.
Tip: You can also heat emboss outline images onto the die background in white embossing powder to add some additional texture (do so before blending ink or watercoloring to save time).
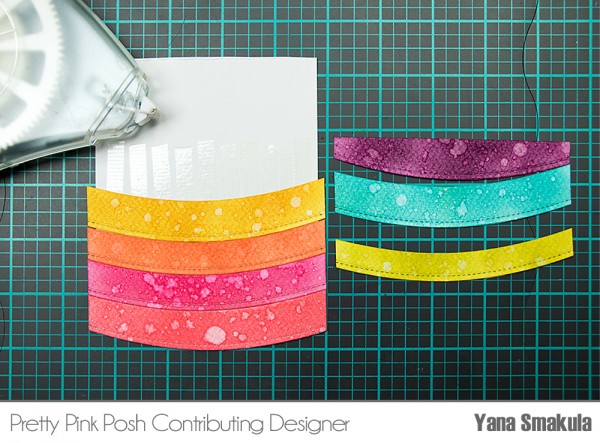
Once I was happy with the result I adhered my die cut panels onto a white cardstock panel using a tape runner and that finished the background for my card. You can also adhere these directly to the card base.
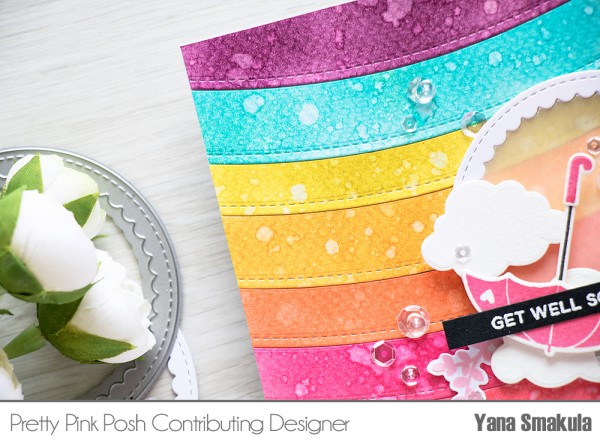
To embellish this project I first stamped and die cut an umbrella from the Rainy Days stamp set, it was a perfect match to go with my rainbow. Because the rainbow background ended up being vibrant I needed to create some sort of screen to mute a part of it and to also house the umbrella and the sentiment.
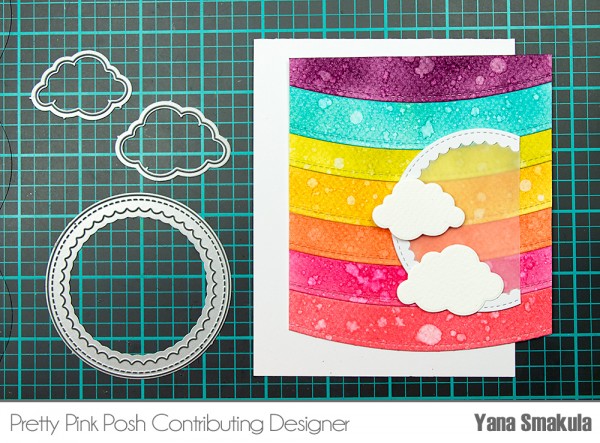
I used the smaller circle die from the Scallop Circles Die set and die cut it out of white cardstock to serve as a frame, the inner section was die cut out of vellum to serve as screen. To be able to adhere these together and to adhere onto the card (and make sure the adhesive would not be visible from under the vellum) I also die cut two clouds using dies from the Rainy Days Coordinating Die set. I did not stamp the clouds, but only used the dies on their own as I feel stamping wasn’t necessary here, these clouds have a perfect shape.
I adhered both of the clouds onto the scalloped circle and this way was able to attach the vellum to the frame. The clouds also let me hide the adhesive to adhere vellum to the background.

Lastly, I heat embossed a Get Well Soon sentiment in white embossing powder over black cardstock for a pop of contrast, adhered it onto the umbrella and foam mounted the latter over the cloud cluster. I also added a little branch from the Holiday Pals stamp set stamped in light pink ink and embellished the card with my favorite clear sequins and small Clear Droplets (I adhered those over the largest sequins).
- Mini Ink Blending Tools: Amazon // Ellen Hutson // Simon Says Stamp
- Mini Ink Foam Refills: Amazon // Ellen Hutson // Simon Says Stamp
- Tim Holtz Distress Cubes: Amazon // Ellen Hutson // Simon Says Stamp
- Versmark: Amazon // Ellen Hutson // Simon Says Stamp
- Wow Bright White Embossing Powder: Amazon // Ellen Hutson // Simon Says Stamp
![]()
We hope you enjoyed today’s tutorial. Happy cardmaking!
Lovely, love all the colours! :-)
Wow this will definitely brighten someone’s day. Awesome.
BEAUTIFUL card and FABULOUS tutorial!!!
THANK YOU for sharing with us Yana :)
What a beautiful card and such a lovely idea. Thank you for the great tutorial. Love it.
Oh so pretty Yana, ♥ this!
This card is just so appealing. One couldn’t help but feel better, if they received it.
Beautiful bright cheerful card!
Yana, this is adorable! I love all the different colors and the see through window! Thanks for sharing and inspiring.
Lovely card Yana. I love the bright colors you used for you rainbow. Thanks for sharing with us your technique for making this card.
Oh my, I LOVE this. Thinking out of the box on how to use the dies. Can’t wait to try it.
Great way to make a rainbow
Gorgeous card Yana – thank you for the “how to” :-) Love the pretty layered elements and the vellum backing!
I love this background die would have many uses. Beautiful card.
Thank you for your tutorial. Anything rainbow brightens my day! Just rec’d PPP order and can’t wait to get it inky and die cut 🤗