
One Stamp Set // Three Animal Cards + Video
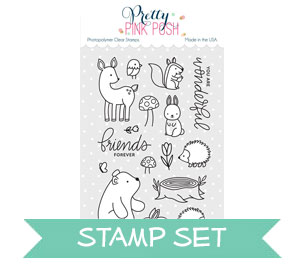
Hi everyone, Eloise here and today I have another 3 cards 1 stamp set video for you all. It was a big hit last time and people seemed to really enjoy it so I thought I would do another one using the Woodland Critters stamp set which definitely seemed to be a favourite from the May release!

To begin my cards today I first stamped and coloured in all my images in with Copic Markers and used the coordinating dies to cut them out.

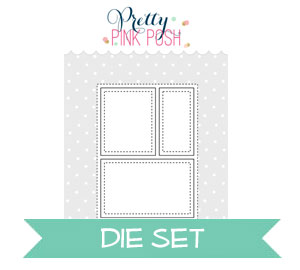
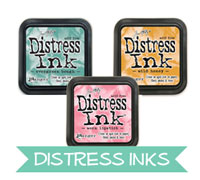
To begin my first card I pulled out the Stitched Borders 1 dies and used the curved stitched border to cut out two sections of my white cardstock panel. I only needed the top and bottom of my panel left so the middle section could be open for colour and my scene. I then took another piece of cardstock and blended some Broken China and Peeled Paint Distress Oxide Inks onto the background, to make sky and land. Once I blended on my colour I sprinkled over some water and heat set it with my heat tool.

I then added adhesive to the back of the inked panel and adhered it down to a scrap piece of paper cut to the same size as my final panel. I then added foam tape onto the back of my white panel piece and adhered it to the same scrap paper piece leaving the opening for the colour to show through. I then added adhesive onto the back of my critters that I was using and added them into the scene. I stamped the ‘Friends Forever’ sentiment from the set with some black ink onto the top right hand side of my panel and finally adhered my panel to a kraft card base.

For my second card I pulled the Storybook 1 die to use as the focal point on my card. I then took the same Stitched Borders 1 dies and used the same curved die to cut a piece of green cardstock. Once my piece was cut I also grabbed some blue cardstock and cut it down to size. I used some Mowed Lawn Distress Ink and ink blended a little on the top of the green cardstock piece to give it some shading and used Broken China Distress Ink to ink the blue piece the same way. This is a way to give a little extra to your flat colours of cardstock. I then die cut the Storybook die from some white cardstock.

I then adhered together my background and hill piece and then adhered down the Storybook frame onto my panel. I used foam tape and flat adhesive to adhere down all the critters I chose to use also. I then stamped the ‘You Are Wonderful’ sentiment onto the bottom of the panel and finally adhered the piece to a white card base.

For my final card I used the Scallop Circle Tags dies to cut a white tag. I then used a circle die to also cut out an additional two circles to fit inside my tag. I cut one circle down to a small hill and coloured that using Mowed Lawn and then used Broken China for the full circle. I adhered the two together and then used foam tape to adhered the coloured circles to my tag. I arranged a small scene using a few of the critters that were left onto the circle and adhered them down into place. For my background of my card I used some plaid paper from Lawn Fawn and adhered it down to a white card base. Then to make the tag feel like it fit with the card I poked a hole through the top centre of the card and also cut a slit in the fold of the card so I could thread some hemp cord through and tie it in a bow, anchoring the tag to the card.

I added some adhesive to the back of the tag so it would sit in place instead of moving around and then for the sentiment I white heat embossed the ‘Friends Forever’ sentiment onto some black cardstock, heat set it, trimmed it down and foam mounted it onto the bottom right hand side of the card.
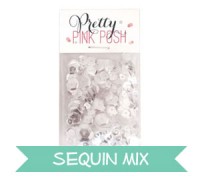
To completely finish off all the cards, I pulled some Sparkling Clear Sequins out of my stash and scattered them around each of my cards to pull them altogether.

Anyway, thanks again, I hope you got inspired and I’ll catch you all next time!
I am totally inspired Eloise, these cards are so sweet. A great video!
Super cute cards. I love critter cards.
Hi Eloise & Paulina ~ These cards are totally adorable, each and every one of them. Thanks so much for sharing and for always beings such a great source of inspiration. Off to watch your video (thanks for including that too). Your 3 cards/1 stamp set + video series is a total home run!! ~HUGS~
#kindnessmatters
Oh my gosh these cards are beautiful. I love the little critters and scenes you created.
Wonderful job on all of these, I love the look of all 3