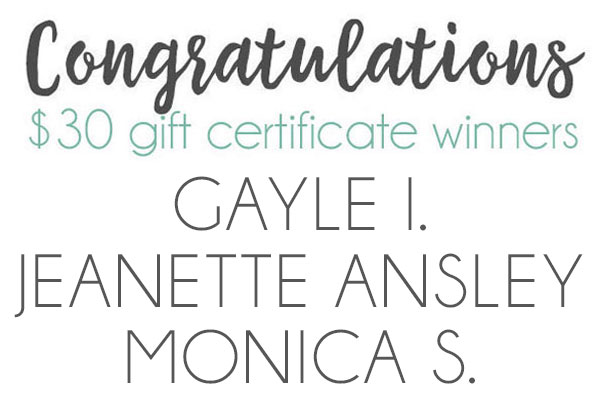
Hello! It’s time to announce the three winners of the March blog hop posts HERE, HERE, and HERE. And the lucky winners of the $30 gift certificates are…
Winners, email me within 7 days to claim your prize!
If you would like even more inspiration with the new release and are on Instagram, we also have a FOUR day Instagram hop with more chances to win a $30 gift certificate if you leave a comment before March 19th!
We hope you were inspired by all the inspiration from the hops and have started creating beautiful spring projects with your new products!
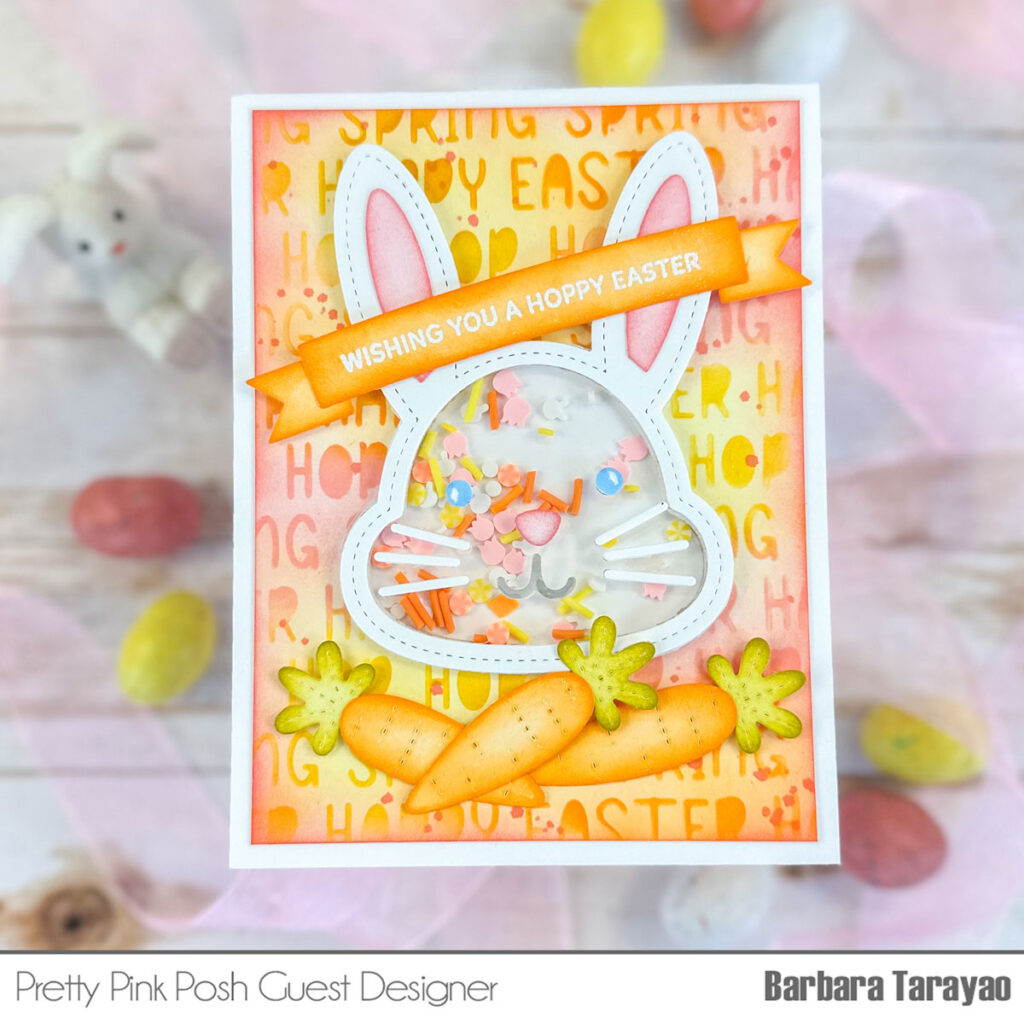
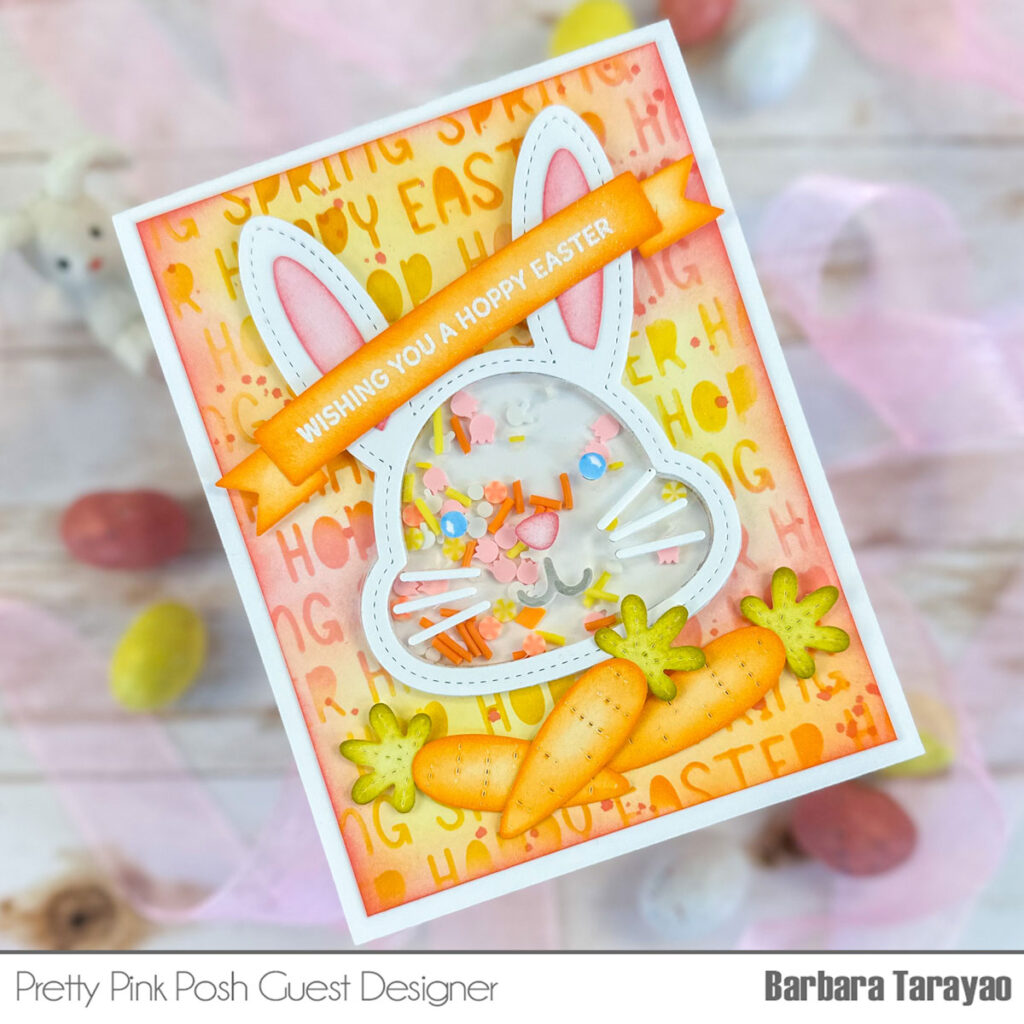
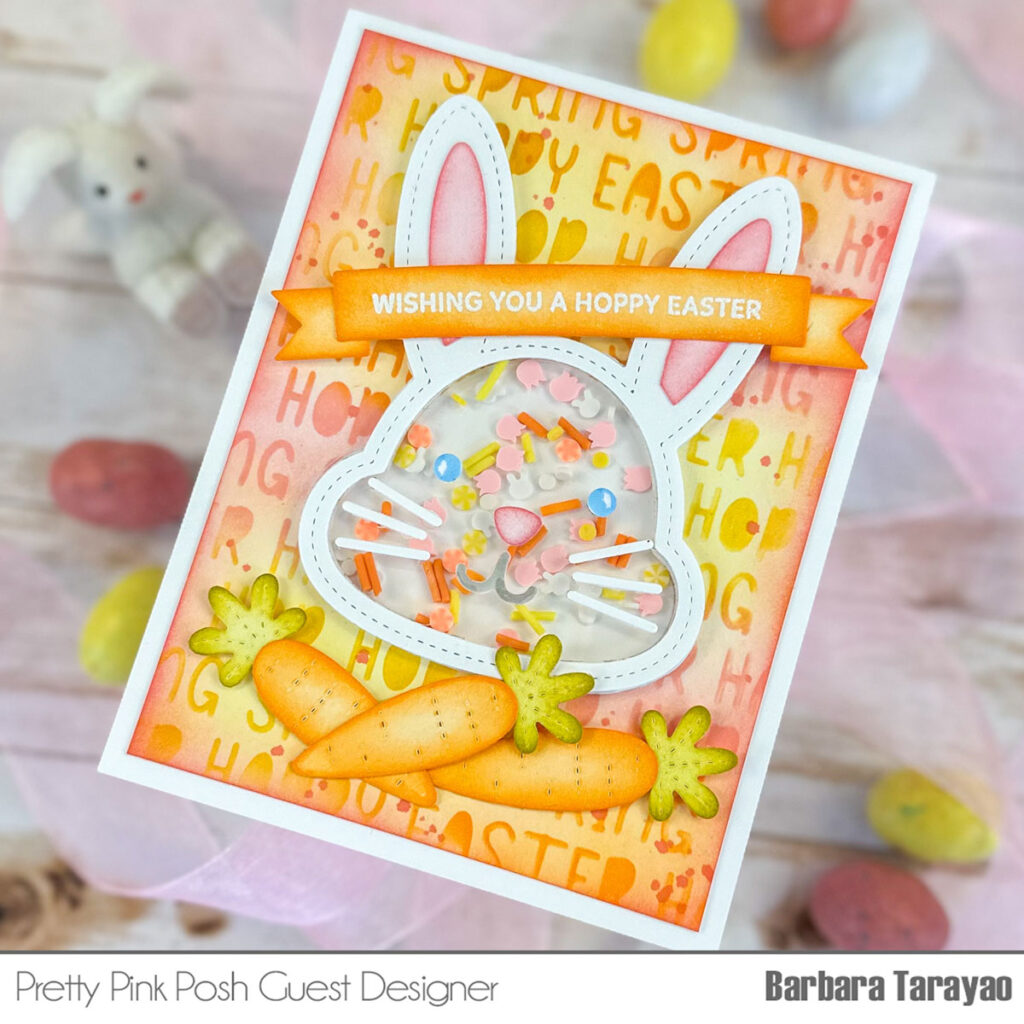
Hello, friends. Barbara here on the Pretty Pink Posh blog and I am so happy to share a project I made using some of the brand new products.
I have made a fun shaker card using the new Bunny Face Shaker die. I made this card using an A2 size card base cut from smooth white cardstock. I then trimmed down another piece of white cardstock to leave a bit of a white border. I then placed the new Easter Words stencilover the white panel and added distress ink over the stencil. I then removed the stencil and ink blended a bit lighter using the same distress inks.
Using a paintbrush, I flicked some distress ink over the stenciled background for some interest. I then die cut the Bunny Face Shaker from white cardstock and added a piece of acetate to the back of the bunny face. I flipped over the bunny face and added the shaker elements to the inside of the bunny and also some foam tape to adhere the piece of white cardstock behind the bunny face to enclose the shaker bits. I trimmed it down and adhered it to the center of the stenciled panel. I then die cut and ink blended the carrots from the newBig Easter Cupcake die setand added them to the bottom of the card.
PRIZES: be sure to leave comments on each stop. We are giving away 3 $30 gift certificates to three random comments (1 winner each day) left before March 13, 2024 at 11:59 PM PST. I’ll be announcing the winners next week, so be sure to return and see if you are one of the winners.
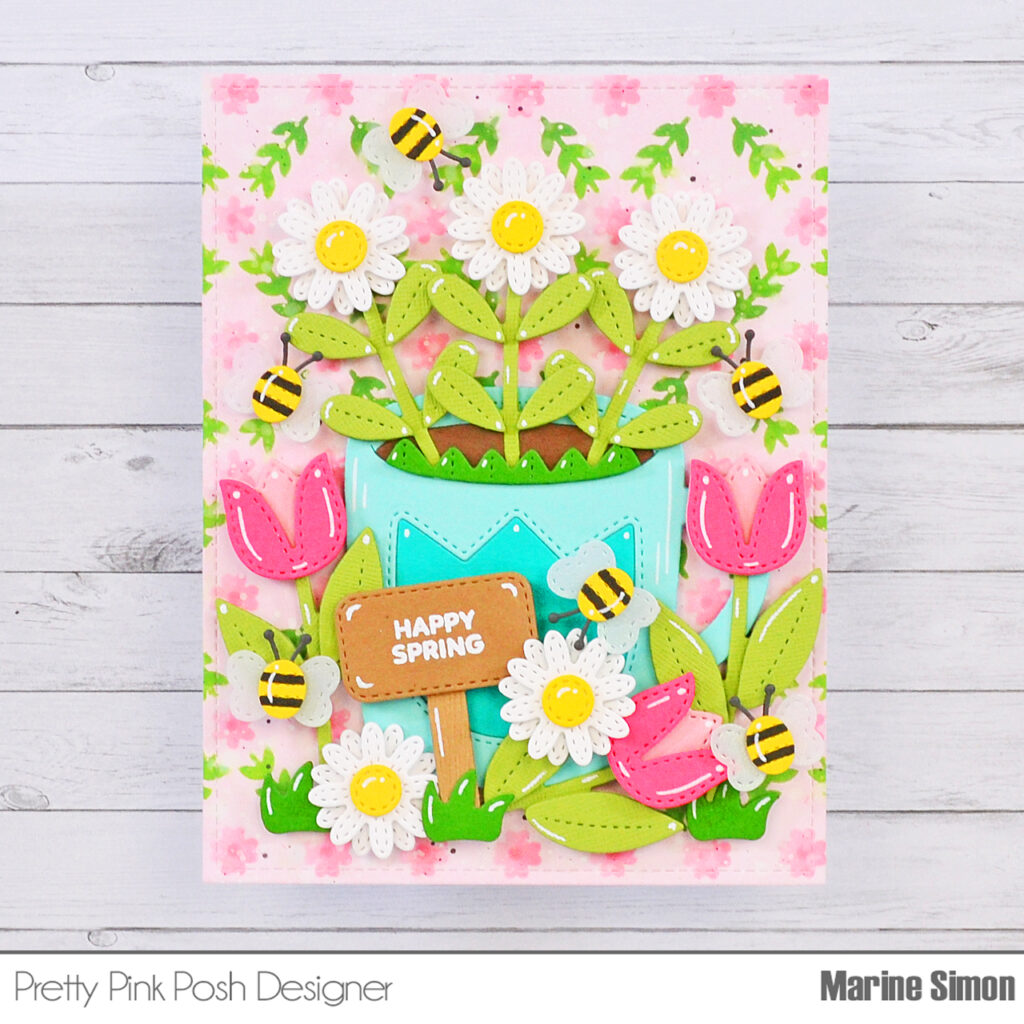
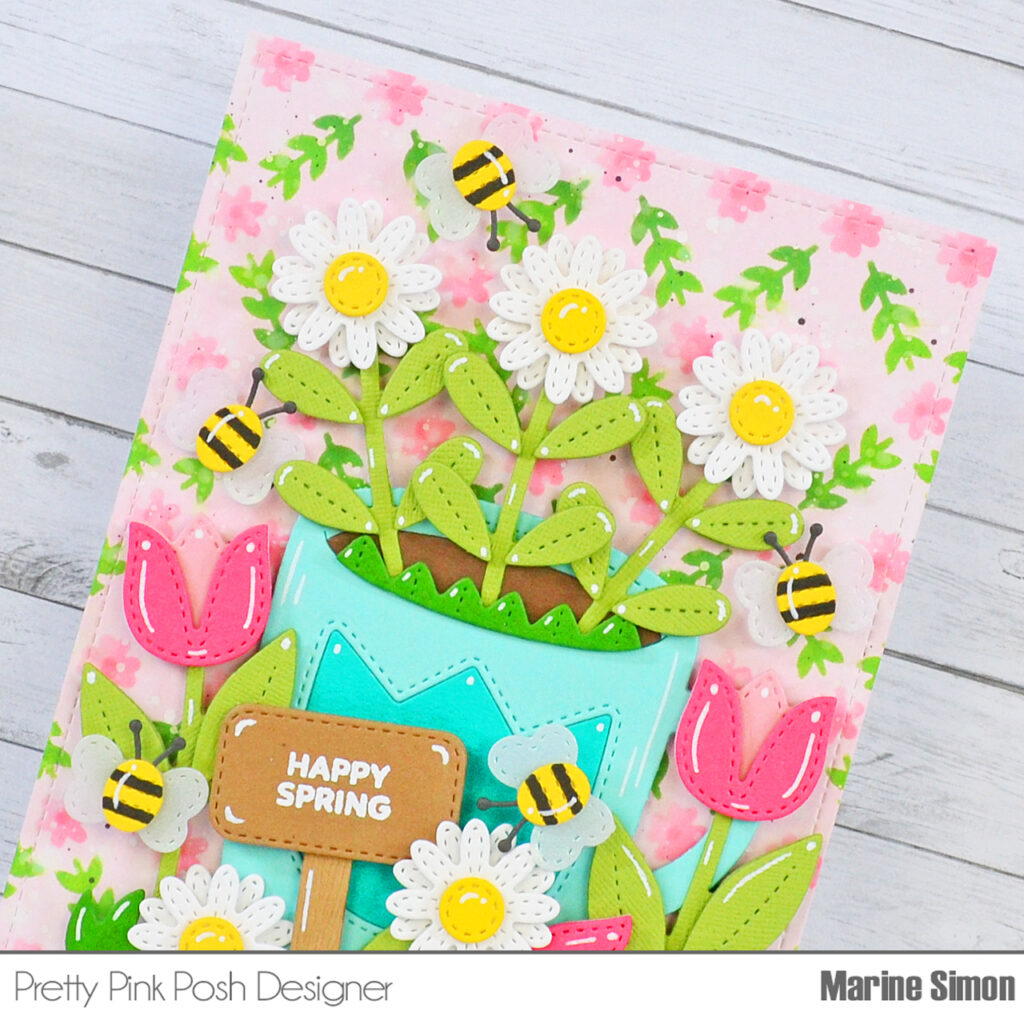
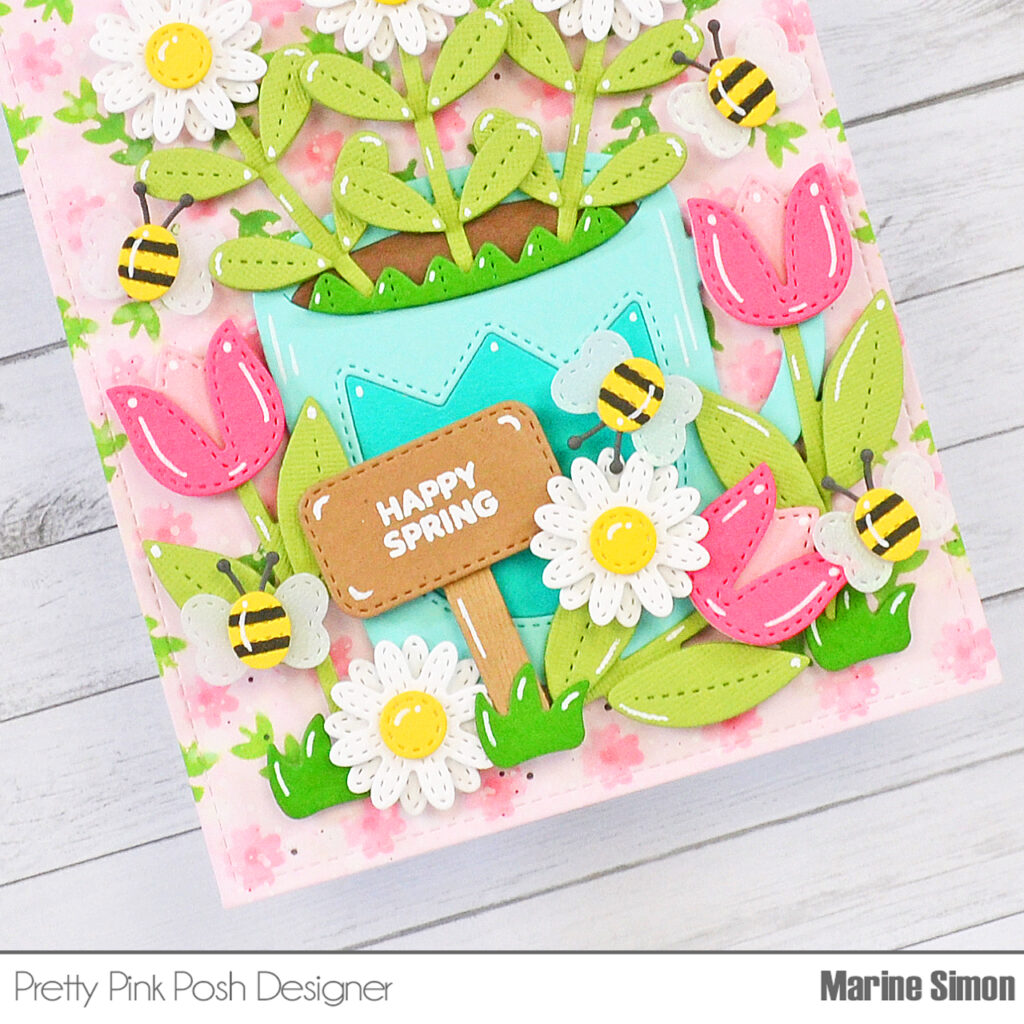
First thing I created was the background. I cut a 5,5 x 4,25 inches Strathmore bristol smooth panel, and started off by covering the piece of paper with spun sugar oxide ink to get a nice soft base. Next I used the Layered Floral Vines stencils to add flowers and greenery to this light pink background. For the flowers I applied worn lipstick oxide ink that I blended in with spun sugar oxide ink, and used worn lipstick again for the center of the flowers. And for the greenery I applied rustic wilderness oxide ink that I blended in with mowed lawn oxide ink.
Every time I create an ink blended background, I like to add texture to make it more interesting. So I first splattered some water all over the panel that I dried using a paper towel. Next I mixed some white ink with water and used a small brush to add more splatters to my panel, and then did the same with black soot oxide ink.
While my panel was drying, I cut all the bits and pieces out of colored cardstock. I used most of the Spring Mug Additions dies to cut everything, but also used the mug and the beverage dies from Winter Mug, as well as the sign die from Big Easter Cupcake to complete my little scene. I cut the bees’ wings out of pearlescent vellum, added black stripes to their bodies using a black marker, and white heat embossed my “Happy Spring” greeting from Easter Signs on the sign.
I assembled and attached everything on my Layered Floral Vines panel using 1mm and 2mm foam squares, and added highlights and details using a white gel pen. And that’s it! It’s definitely springtime on a card, I love those beautiful flowers and cute bees! I hope you like them, too.
PRIZES: be sure to leave comments on each stop. We are giving away 3 $30 gift certificates to three random comments (1 winner each day) left before March 13, 2024 at 11:59 PM PST. I’ll be announcing the winners next week, so be sure to return and see if you are one of the winners.
The March 2024 Release is now available in the Pretty Pink Posh Shop and select retailers that carry our products. If you missed our post yesterday, we revealed all of the products in picture form, but if you would like to see them in a video, Mindy has that for you today!
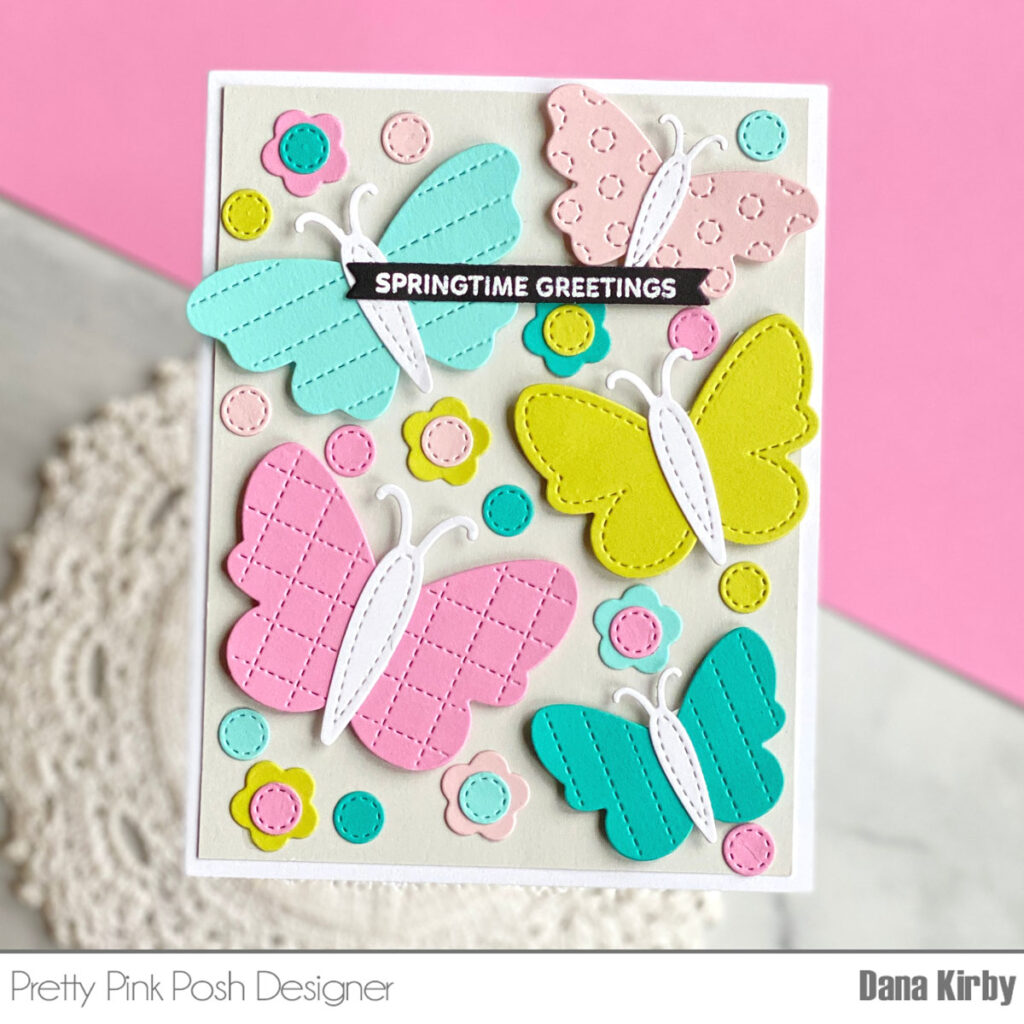
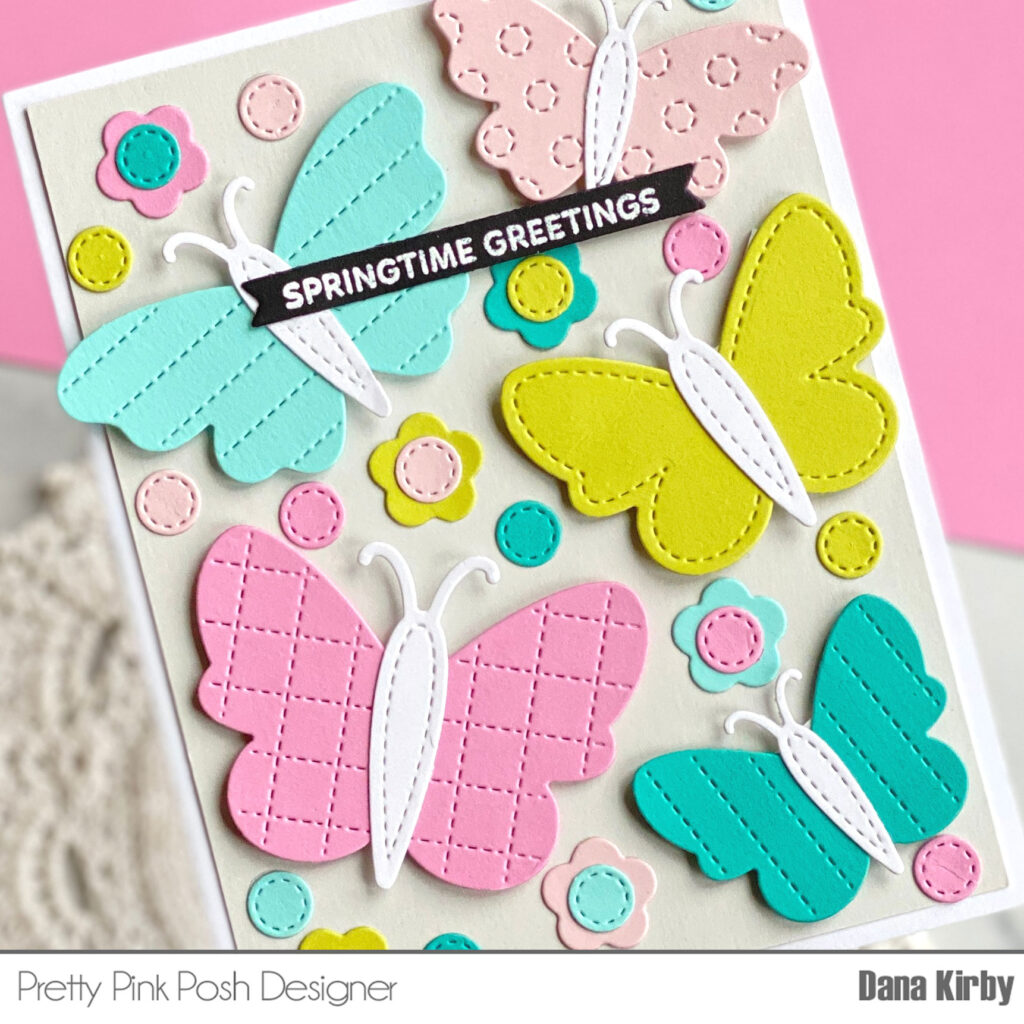
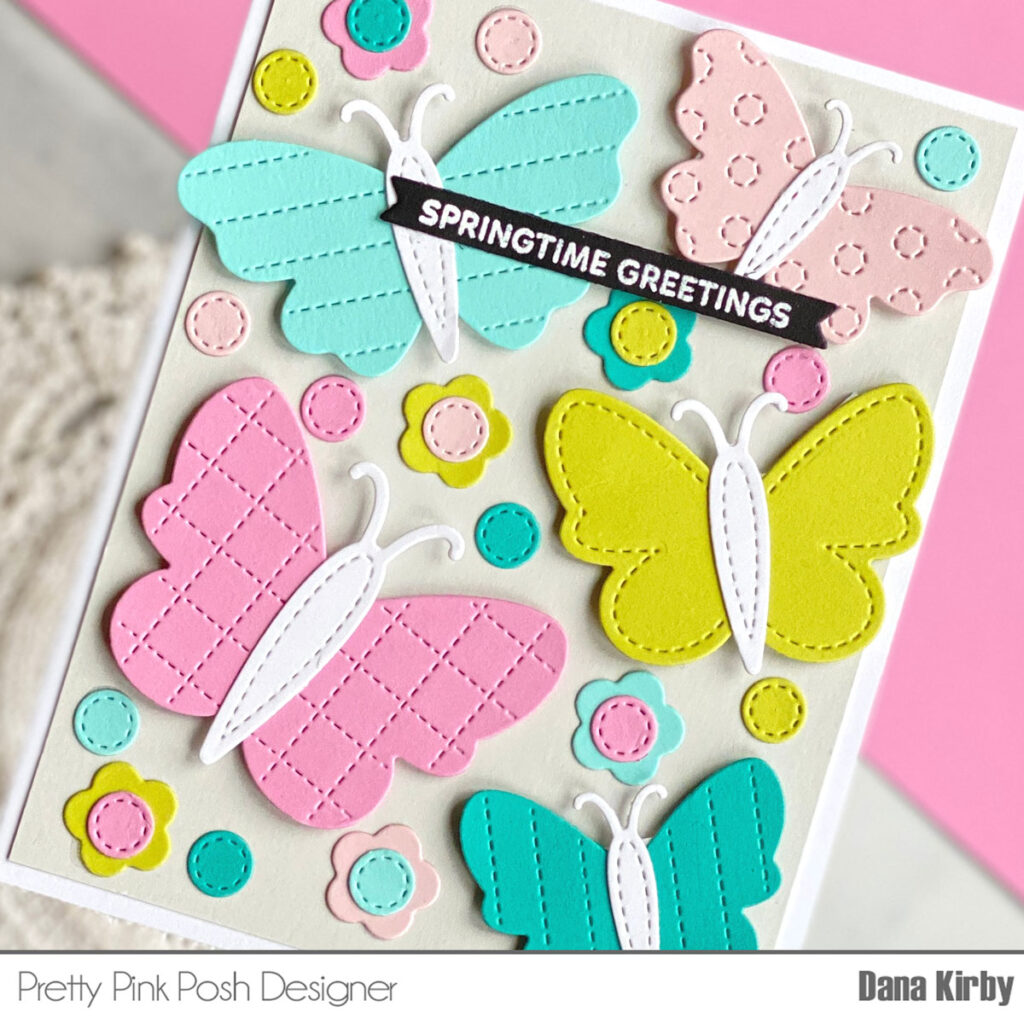
Hi crafty friends! It’s Dana here today and I am back with a fun Springtime card to share with you all.
I started my card by die cutting my butterflies with the Stitched Butterflies die set. I attached the butterflies to a soft gray card panel with foam adhesive. Next, I used the Spring Mug Additions die set to die cut my small stitched circles and the Big Easter Cupcake die set to die cut the small flowers (which actually can be used as a bunny tail). I then attached the small flowers and stitched dots to fill in my panel in a random pattern.
Lastly, I used the Sentiment Strips: Easter stamp set to stamp my sentiment. Although I made a springtime/Easter card I think this same design will work great for a birthday card or even to welcome a new baby. The color combinations are endless! I hope I inspired you to create a similar card of your own.
PRIZES: be sure to leave comments on each stop. We are giving away 3 $30 gift certificates to three random comments (1 winner each day) left before March 13, 2024 at 11:59 PM PST. I’ll be announcing the winners next week, so be sure to return and see if you are one of the winners.
Hello! It’s time to announce the five winners of the birthday celebration hop posts HERE, HERE, HERE, HERE, and HERE. And the lucky winners of the $30 gift certificates are…
Winners, email me within 7 days to claim your prize!
If you would like even more inspiration with the new release and are on Instagram, we also have a FOUR day Instagram hop with more chances to win a $30 gift certificate if you leave a comment before February 21st!
We hope you were inspired by all the inspiration from the hops!
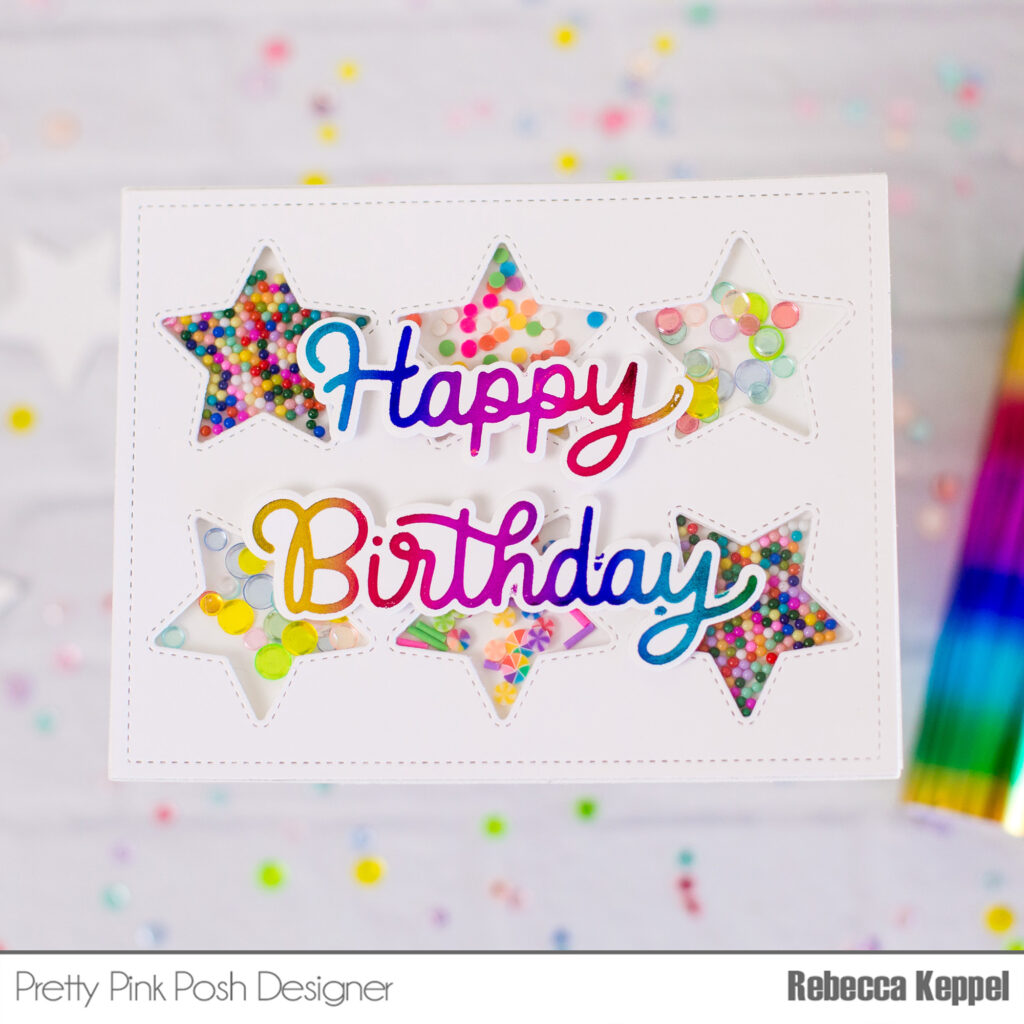
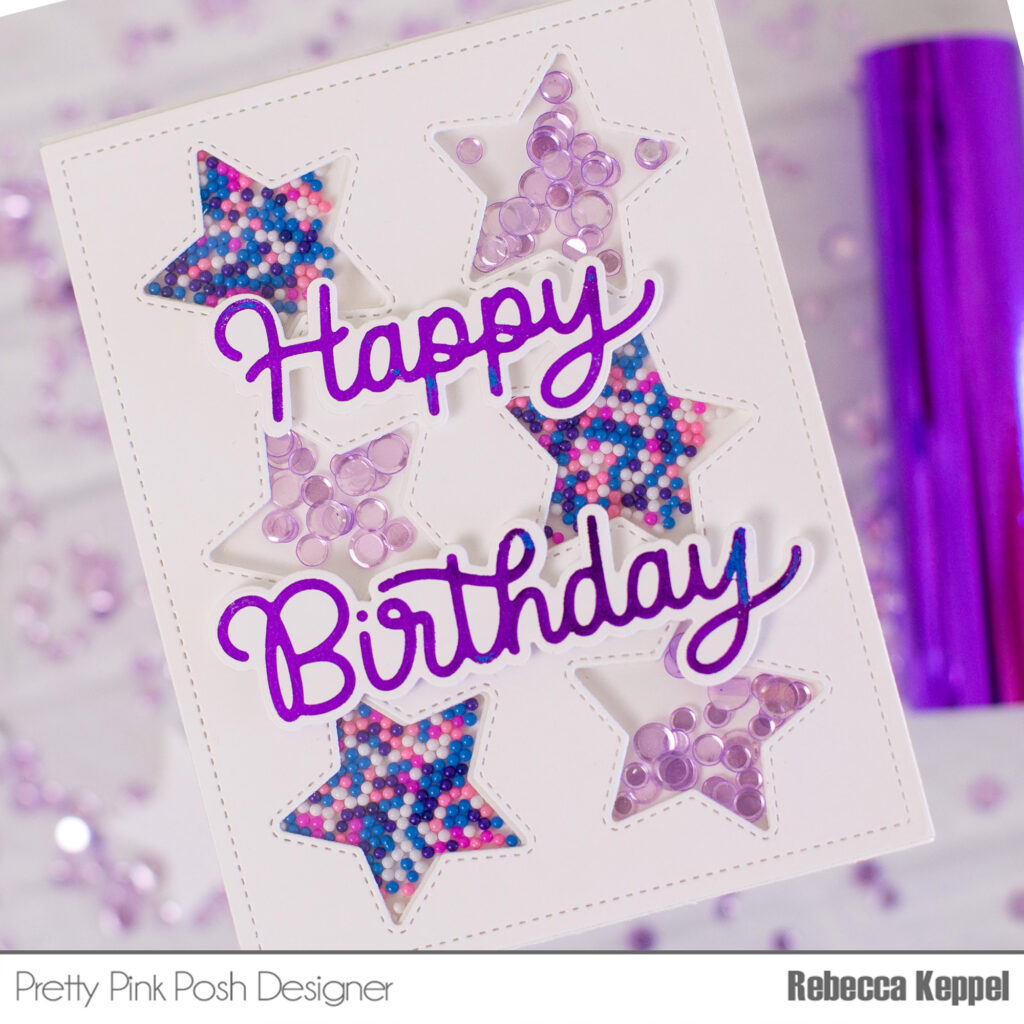
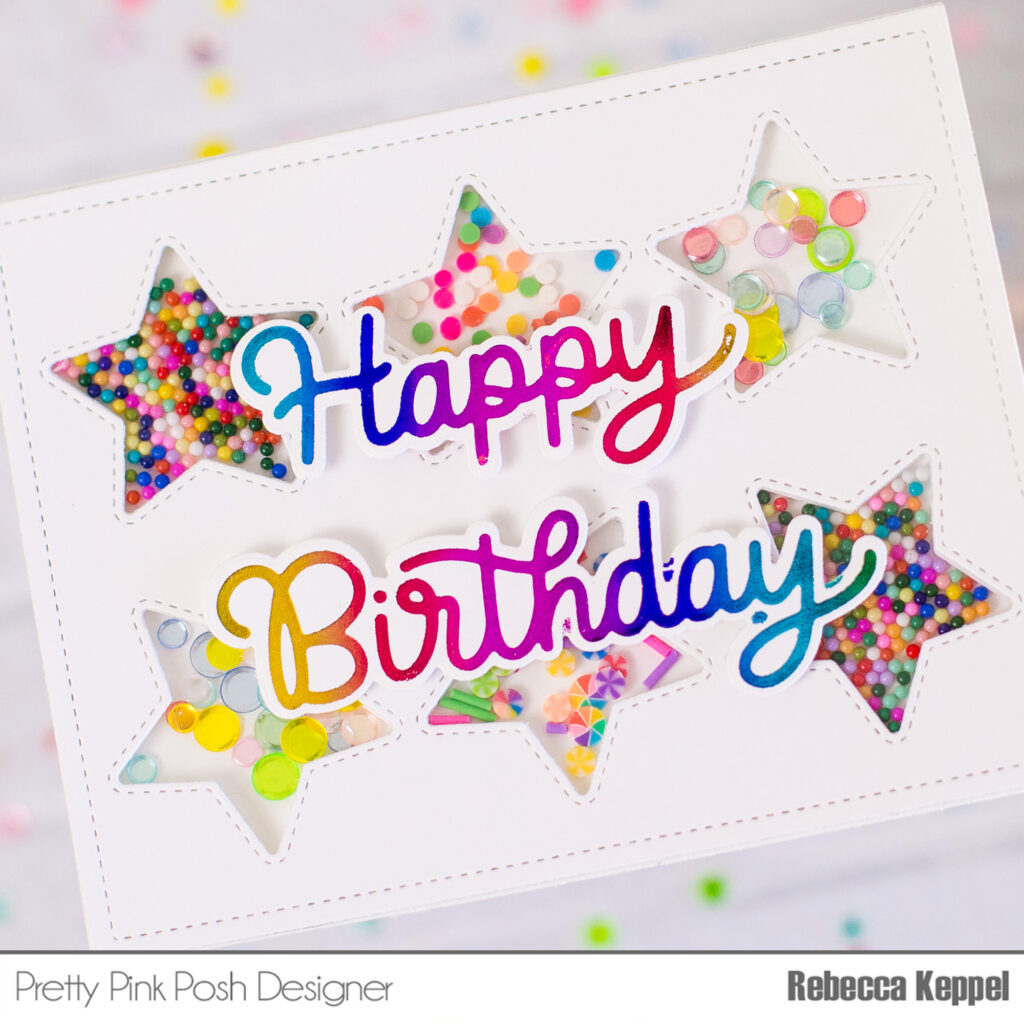
Hi crafty friends! I’m Rebecca here with two shaker cards today! Both are made with the Star Cover Plate, but the nifty part about this month’s cover plate die is that, since stars are symmetrical, you can use this die horizontally or vertically!
Simply cut the Star Cover Plate out of two pieces of cardstock and two pieces of fun foam. Adhere the die cut fun foam over an A2 piece of cardstock. Adhere an A2 piece of acetate behind the die cut cardstock. For one card use the Berry Smoothie Shaker Beads and Purple Shimmer Confetti Mix.
We are having a special gift offer and discount code to celebrate our birthday!
PRIZES: be sure to leave comments on each stop. We are giving away 5 $30 gift certificates to random comments (1 winner each day) left before February 16, 2024 at 11:59 PM PST. We’ll be announcing the winners on the PPP blog, so be sure to return and see if you are one of the winners and/ or sign up for our blog posts to your email!
Thank you all so much for your order, comments, and excitement about this release. We are so thankful! Stay tuned for more inspiration on the blog and we’ll have a separate Instagram hop starting tomorrow!
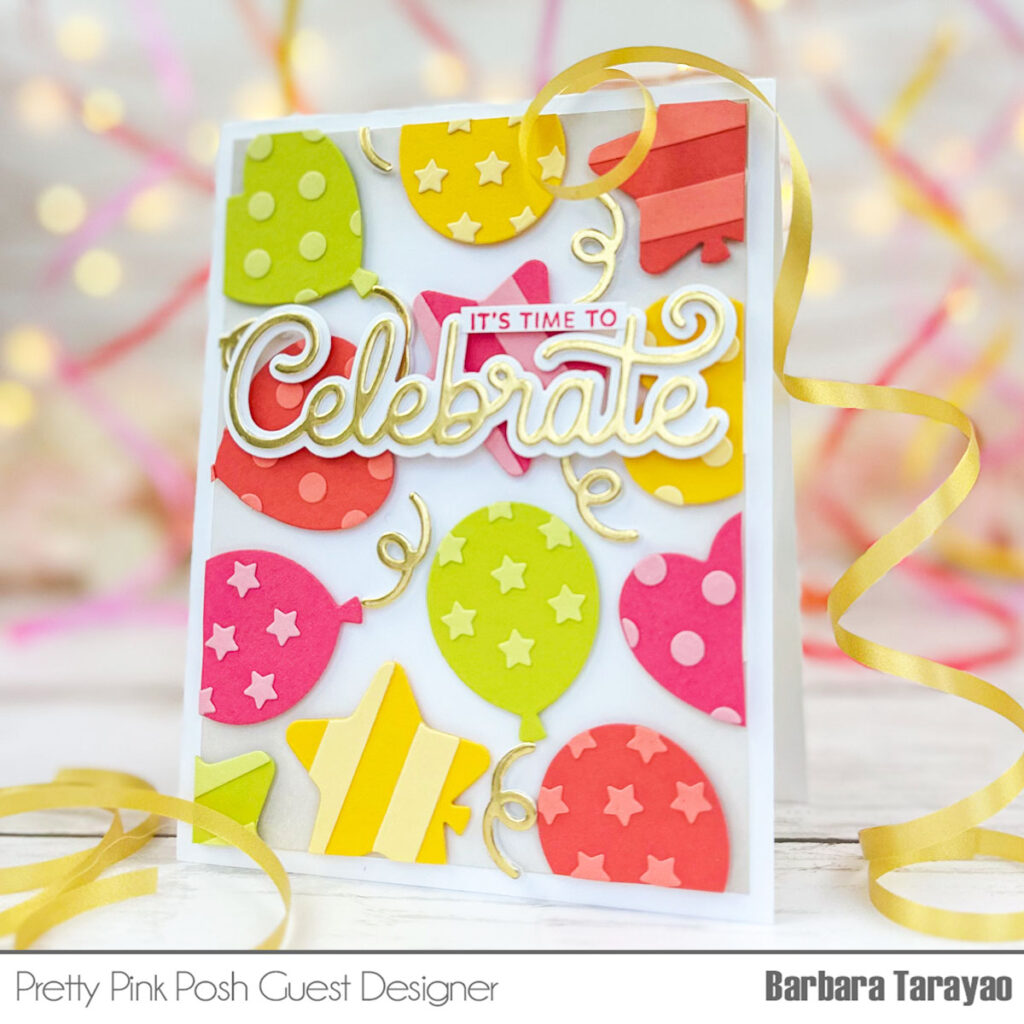
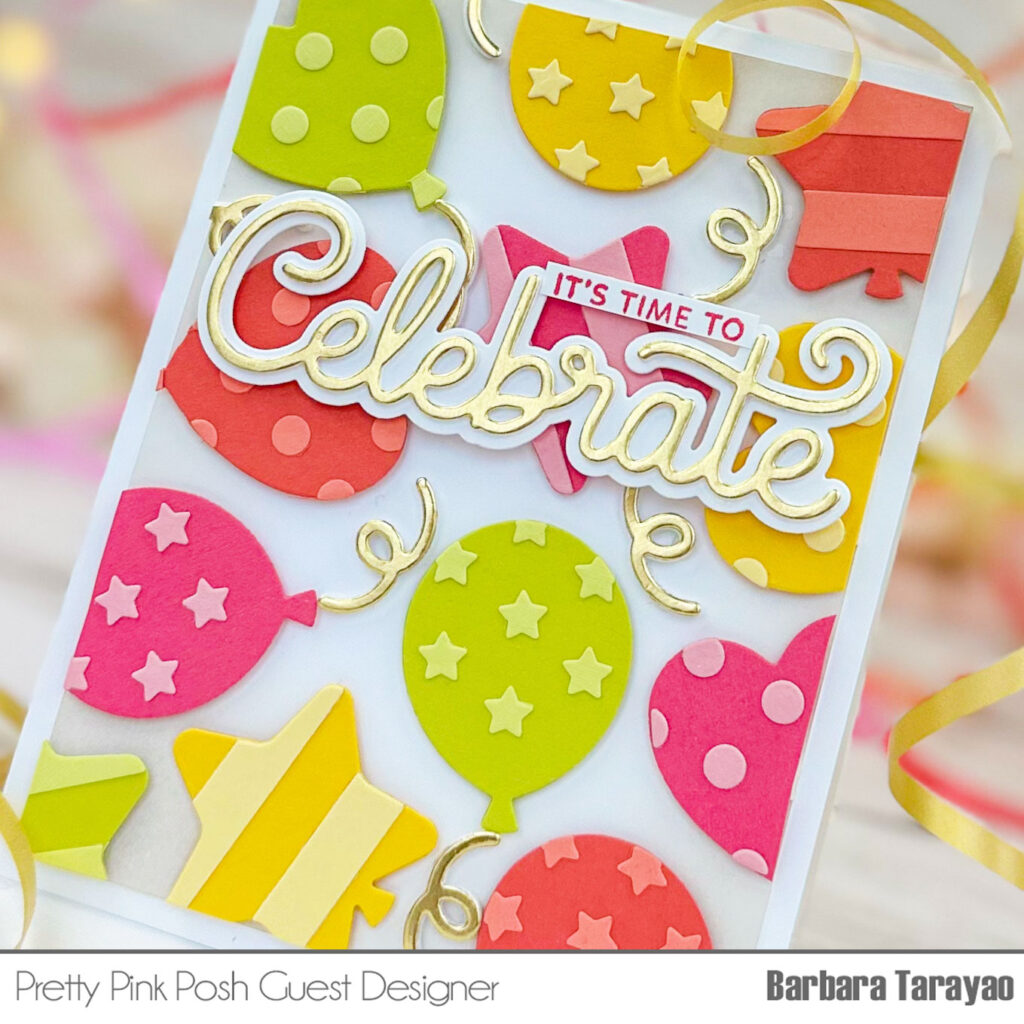
Hello crafty friends! I hope you’ve been enjoying all the birthday festivities so far. Barbara here and I am so happy to have a chance to share a project I made for Pretty Pink Posh’s 10th birthday celebration!
For this project, I used the brand new Party Balloons die set. I used the technique of die cutting the balloons out of a variety of toned colored cardstock to create a background.
I created an ink blended panel with soft gray distress ink and arranged the balloons on the panel to make them look like they were flying around. I adhered them with foam squares and then added the LargeCelebrate Shadow die cut from gold cardstock for a festive look.
We are having a special gift offer and discount code to celebrate the birthday festivities!
PRIZES: be sure to leave comments on each stop. We are giving away 5 $30 gift certificates to random comments (1 winner each day) left before February 16, 2024 at 11:59 PM PST. We’ll be announcing the winners on the PPP blog, so be sure to return and see if you are one of the winners and/ or sign up for our blog posts to your email!
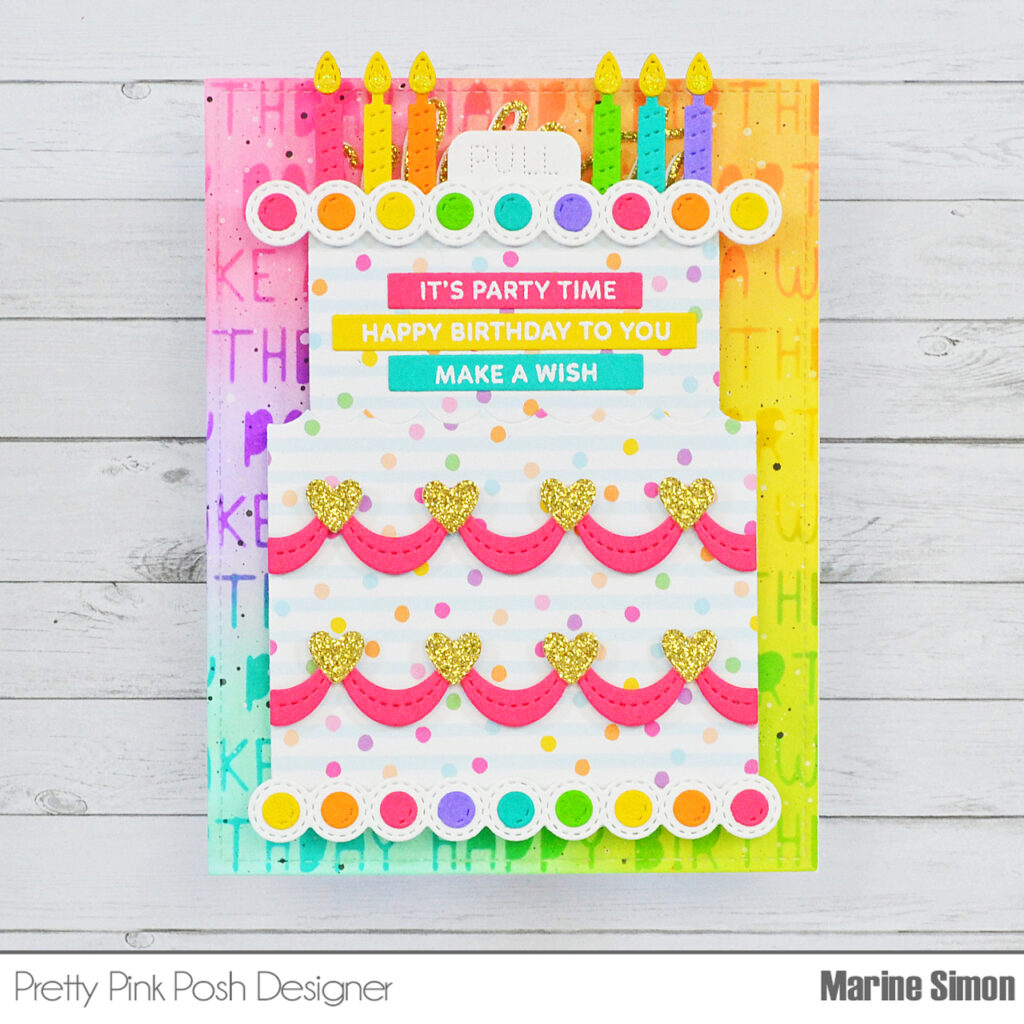
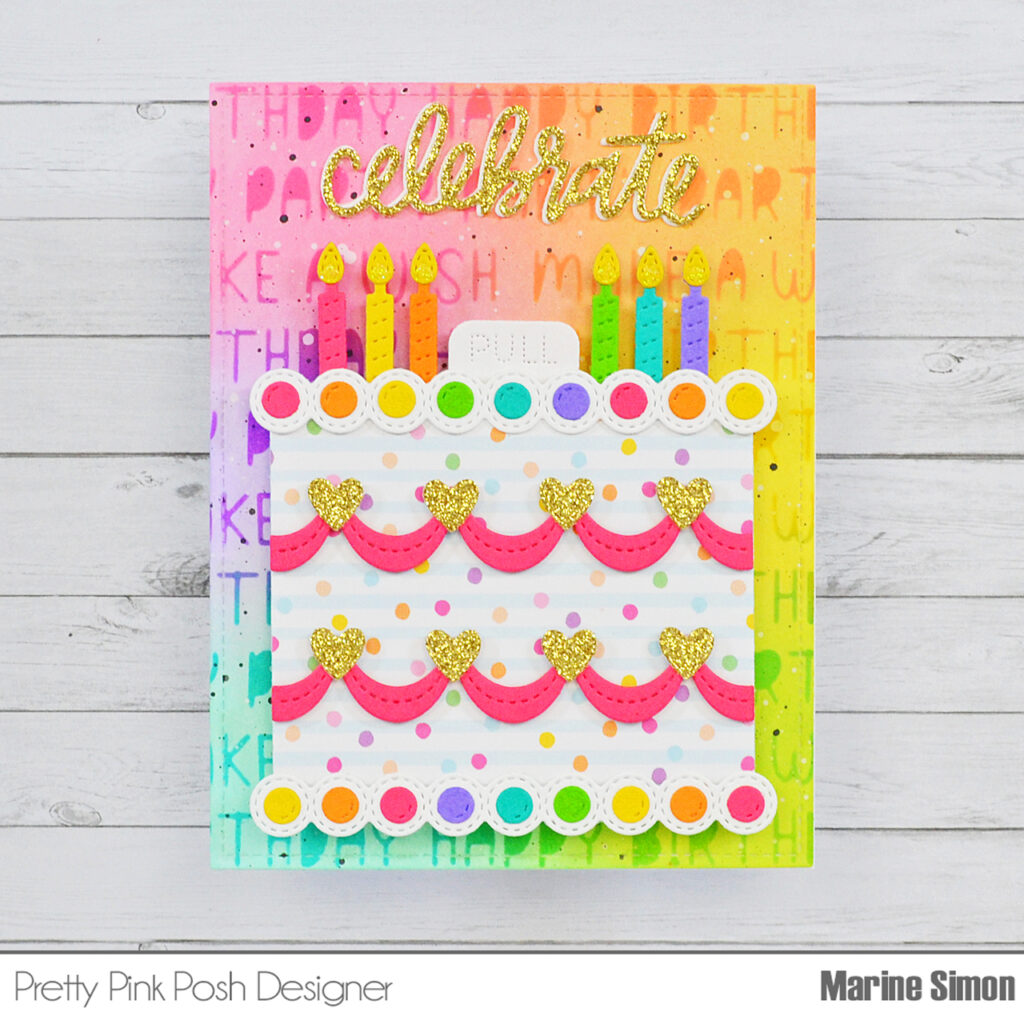
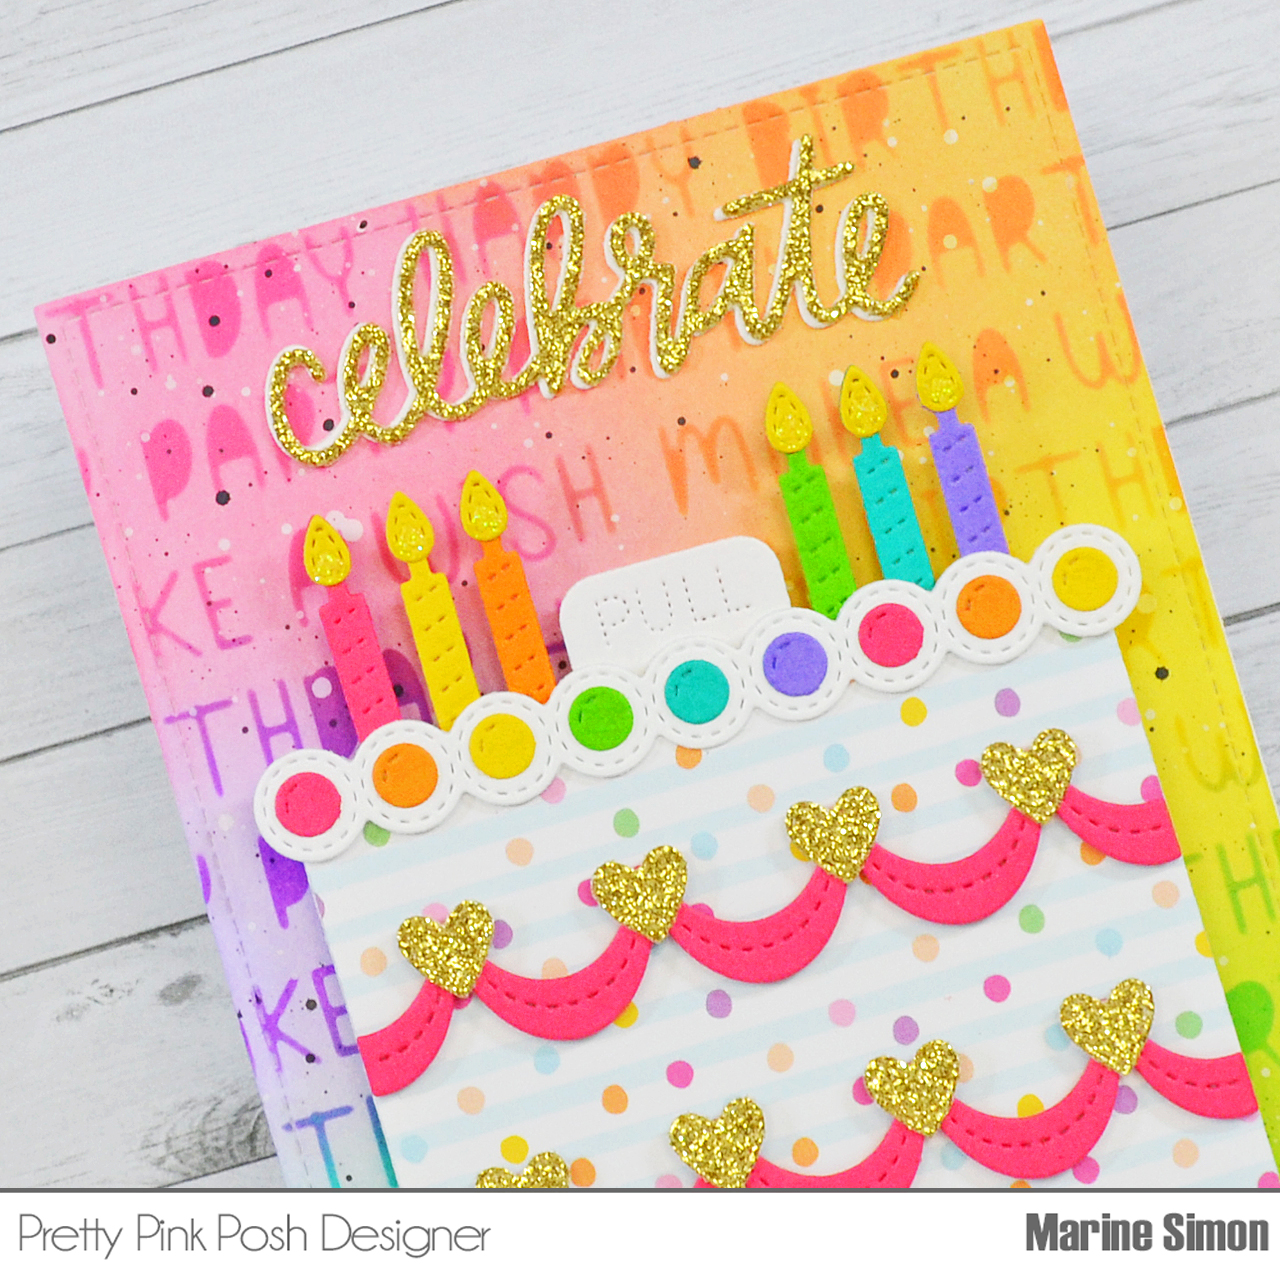
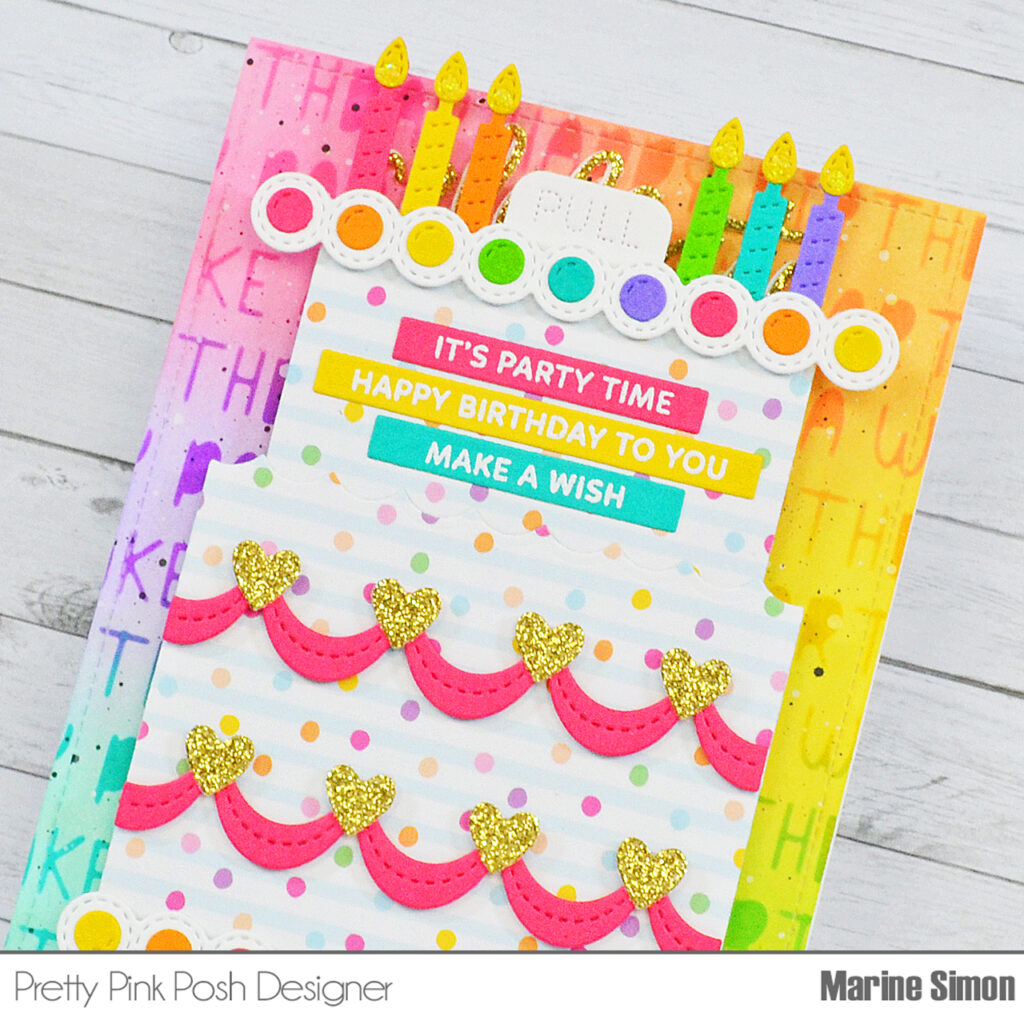
Hello crafty friends, Marine here. I’m thrilled to be sharing with you this card featuring the new Interactive Cakedie set. I love interactive cards, they’re so fun to make, so I was over the moon when this new die was released!
I started off by creating a fun rainbow background on a 5,5 x 4,25 inches Strathmore bristol smooth panel. I first applied and blended oxide inks in a clockwise direction, starting from the top left hand corner: kitsch flamingo, dried marigold, squeezed lemonade, twisted citron, salvaged patina and shaded lilac. Next I used the Birthday Words stencil and more oxide inks to bring more interest to my panel, creating a tone on tone look, using picked raspberry, spiced marmalade, mustard seed, mowed lawn, peacock feathers and wilted violet. And as always I added texture: I mixed some black soot oxide ink with water and used a small brush to make splatters all over the panel, and then did the same with copic opaque white ink.
I knew that I wanted to add multiple greetings inside the cake, but I still wanted to have a bold sentiment right above my Interactive Cake, so I cut “Celebrate” from the Gift Card Bag die set out of gold glitter cardstock and out of white cardstock. I glued the gold glitter word on top of the white one, but shifted it a tiny bit to the right to create a white border, and then attached my “Celebrate” at the very top of my panel using liquid glue.
Next I moved on to the Interactive Cake, and started off by working on the upper part. I cut the top piece out of a fun polka dot pattern paper, as well as a white circle border and multiple colored circles that I glued on the circle border in a rainbow order using liquid glue. Next I attached this border at the very top of my cake panel using 1mm foam squares, and then cut more elements such as the white pull tab and six colorful candles and lights. I attached those different pieces at the top of my cake panel: the pull tab in the center and three candles on either side. I also white heat embossed three different Sentiment Strips: Birthday greetings on colored cardstock, trimmed them into slim banners using Sentiment Strips dies, and attached them on my cake panel right below the rainbow circle border using liquid glue.
Next I moved on to the lower part of my Interactive Cake. I cut the bottom piece out of the same polka dot pattern paper as before. I also cut another white circle border, as well as colorful circles that, again, I glued on the white border in a rainbow order using liquid glue. I attached this circle border at the very bottom of my cake panel, and then cut more items such as a couple of pink scallop decorative pieces and six gold glitter hearts that I attached on the cake using 1mm foam squares.
To build my cake, I first added 1/8″ (= 3mm) foam strips at the back on the bottom piece of cake, along the very left and right edges and along the very bottom edge as well, leaving the scallop shaped top edge with no foam. I placed the top piece of cake behind the bottom piece, right between the foam strips, peeled the backing papers off the foam, and attached my cake on another bottom panel I had cut before, creating this way some sort of a pocket in which the top part of the cake can slide in and slide out.
The last thing I did was to add some morning dew nuvo drops on each candle to make them sparkle. And that’s it! I had a blast creating this bright rainbow Interactive Cake card, and I hope you enjoy the result.
We are having a special gift offer and discount code to celebrate the birthday festivities!
PRIZES: be sure to leave comments on each stop. We are giving away 5 $30 gift certificates to random comments (1 winner each day) left before February 16, 2024 at 11:59 PM PST. We’ll be announcing the winners on the PPP blog, so be sure to return and see if you are one of the winners and/ or sign up for our blog posts to your email!
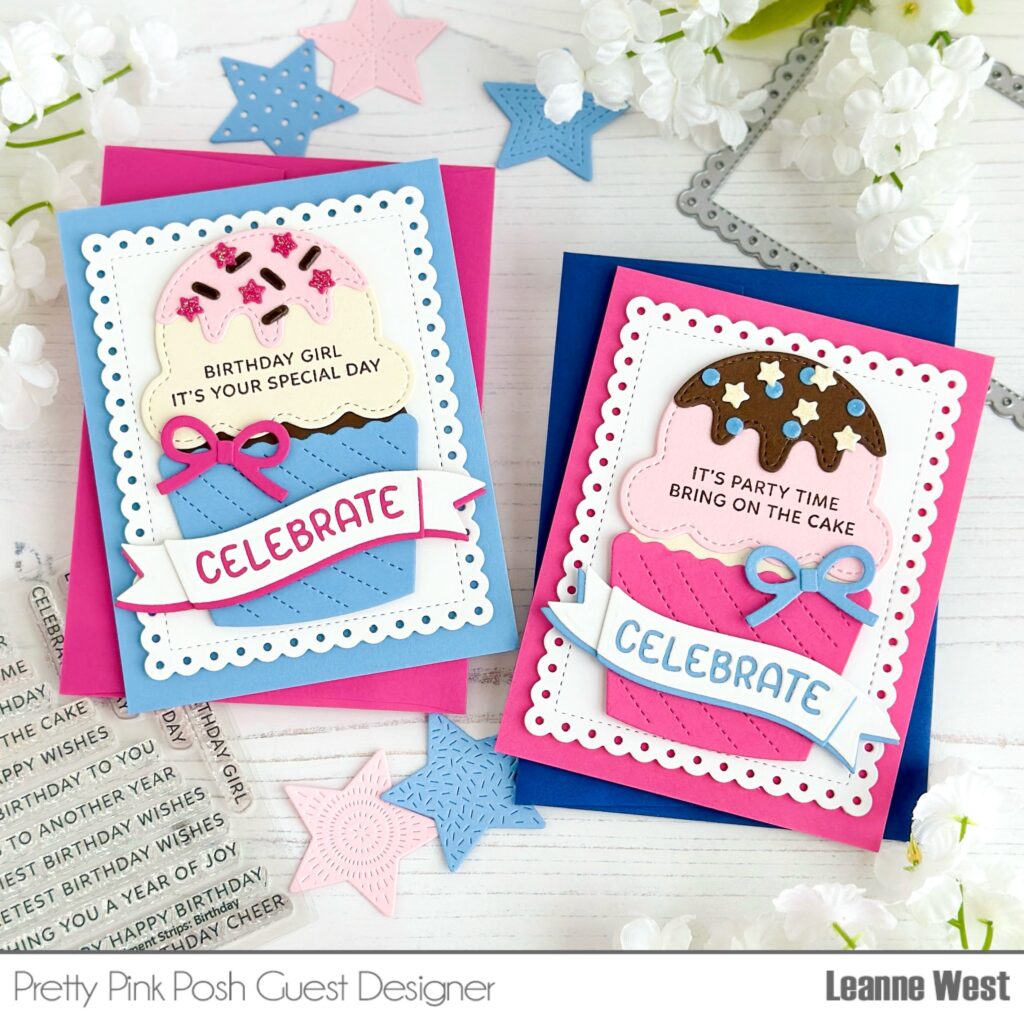
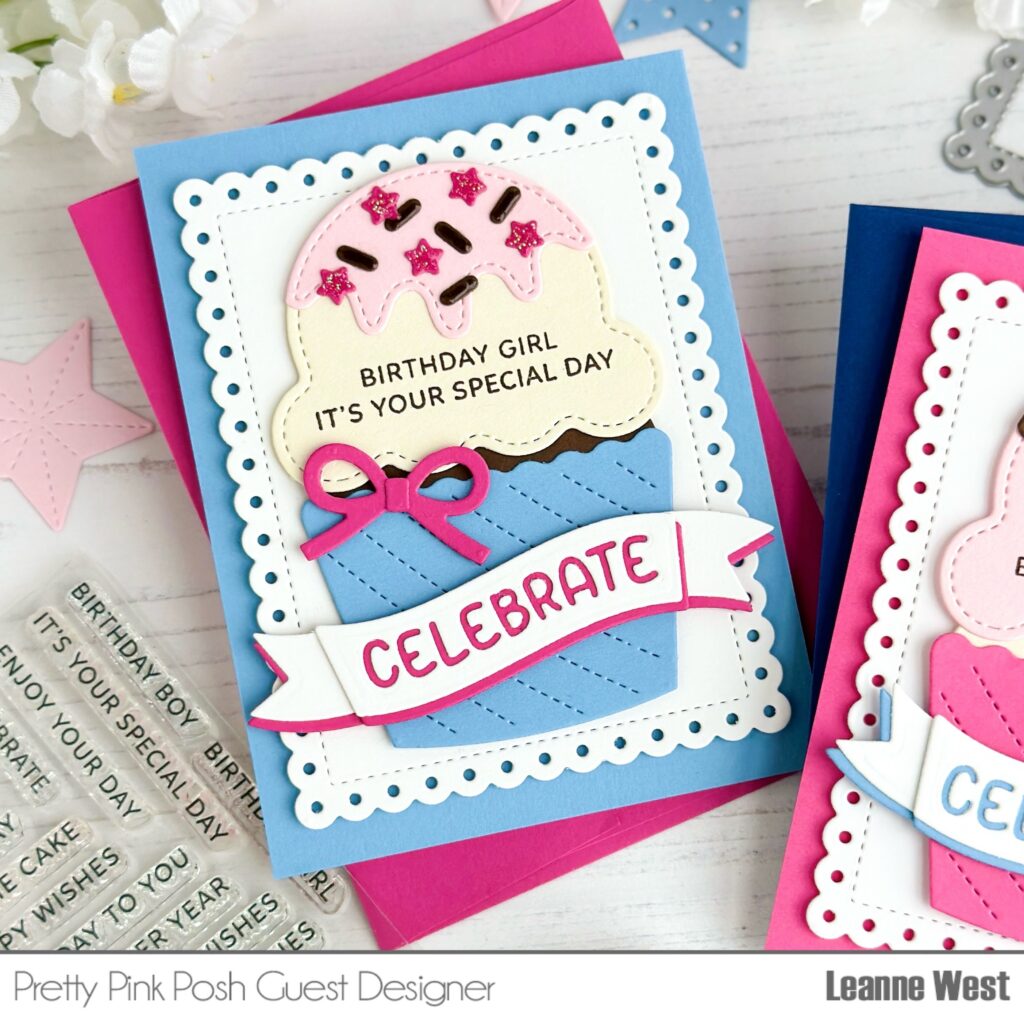
Hello everyone! Leanne here and I’m so excited be a guest on the blog today. I have some fun birthday cards to share showcasing the new Big Birthday Cupcake dies. If you loved the Big Valentine Cupcake die set then you’ll definitely be interested in this new cupcake set.
These cards are 4bar size. The 4bar size is 3 1/2 inches by 4 7/8″. It’s such a cute size and makes a perfect little note card to enclose with a gift. The cupcakes fit nicely on this size too!
I was inspired by the color palette of the Berry Smoothie Shaker Beads. It’s such a pretty mix of pinks and blues. I pulled card stock from my stash matching those colors to create my cupcakes using the Big Birthday Cupcake dies.
Once I had the cupcakes assembled, I adhered them to a decorative panel created with the second largest Eyelet Rectangle die. The Sentiment Strip Birthday stamp set had the perfect greetings to add to my cards. I stamped them right onto the cupcake frosting part.
It’s a little hard to see in the photos, but I applied some Glossy Accents and Stickles Glitter to the sprinkles on each cupcake. This added a bit of sparkle and shine. That’s it and these cards are ready for gifting! They were so quick and easy to make. I’m sure they would be fabulous in many other color combinations.
We are having a special gift offer and discount code to celebrate the birthday festivities!
PRIZES: be sure to leave comments on each stop. We are giving away 5 $30 gift certificates to random comments (1 winner each day) left before February 16, 2024 at 11:59 PM PST. We’ll be announcing the winners on the PPP blog, so be sure to return and see if you are one of the winners and/ or sign up for our blog posts to your email!
The February 2024 Release is now available in the Pretty Pink Posh Shop and select retailers that carry our products. If you missed our post yesterday, we revealed all of the products in picture form, but if you would like to see them in a video, Mindy has that for you today!
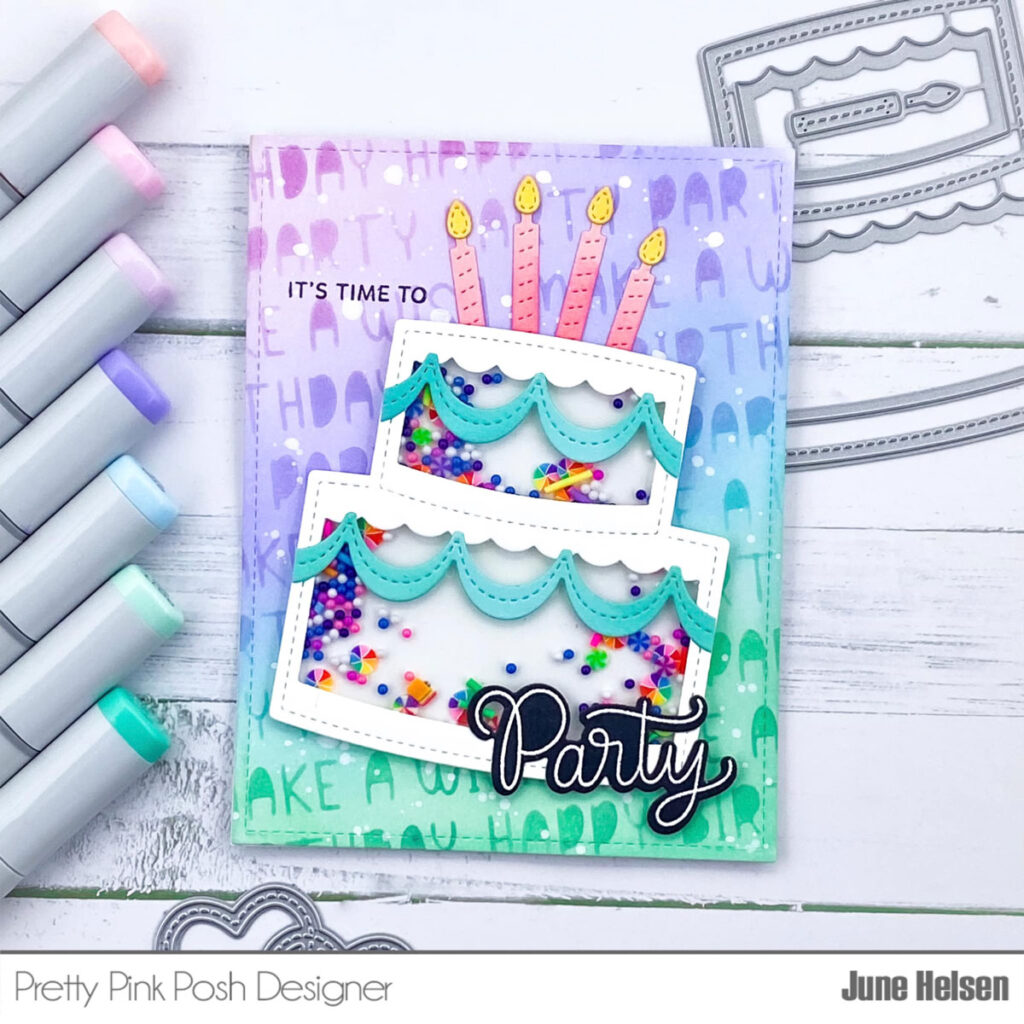
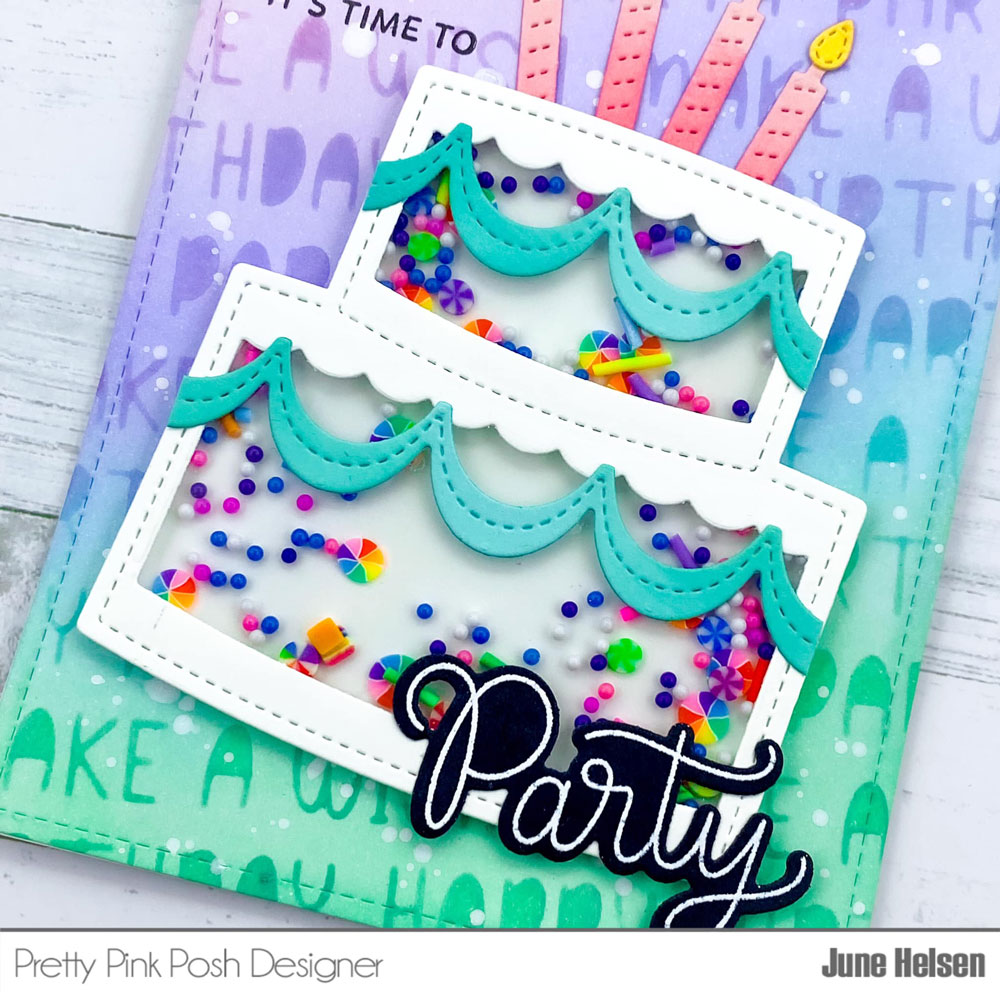
Hello crafty friends, June here! Today I’m sharing a new card featuring a lot of the new products from the birthday release.
I knew I wanted a very colorful background, so that’s what I started working on first. I used the Birthday Words Stencil and various colors of Distress Oxide to create an ombre background. For the fade itself I used Milled Lavender, Shaded Lilac, Salvaged Patina and Cracked Pistachio. For the stenciled layer I used a darker shade of each of those colors, which were Seedless Preserves, Dusty Concord, Peacock Feathers and Lucky Clover. I used a very light hand to apply these colors. To finish off my panel I also splattered some thinned acrylic paint on it.
One of my favorite products from this release is the Cake Shaker die. I cut it out of cream colored cardstock and made it into a shaker using some acetate and foam tape. I combined shaker bits from both the Over The Rainbow and the Berry Smoothie Mix to get the perfect color combination.
I added the candles from the Interactive Cakedie set on top of the cake and for some extra embellishments, I also added the scalloped piece that’s included in the same die set. I cut them out of different colors of cardstock and added some light ink blending on the sides for some extra definition.
For my sentiment, I stamped the ‘Party’ script from the Party Timestamp setonto some black cardstock and I embossed it with white embossing powder. I completed the sentiment by adding the ‘it’s time to’ at the top of my card panel. I adhered everything in place and tadaaaa! My festive shaker card is all done!
We are having a special gift offer and discount code to celebrate the birthday festivities!
PRIZES: be sure to leave comments on each stop. We are giving away 5 $30 gift certificates to random comments (1 winner each day) left before February 16, 2024 at 11:59 PM PST. We’ll be announcing the winners on the PPP blog, so be sure to return and see if you are one of the winners and/ or sign up for our blog posts to your email!