Tutorials

| | |

Mother’s Day Box Card

Hi, friends! It’s Lauren and I am back with a new video on the Pretty Pink Posh YouTube channel today. We’re continuing with our box cards – this month for Mother’s Day!

Watch the video above  I  Watch the video in HD on YouTube

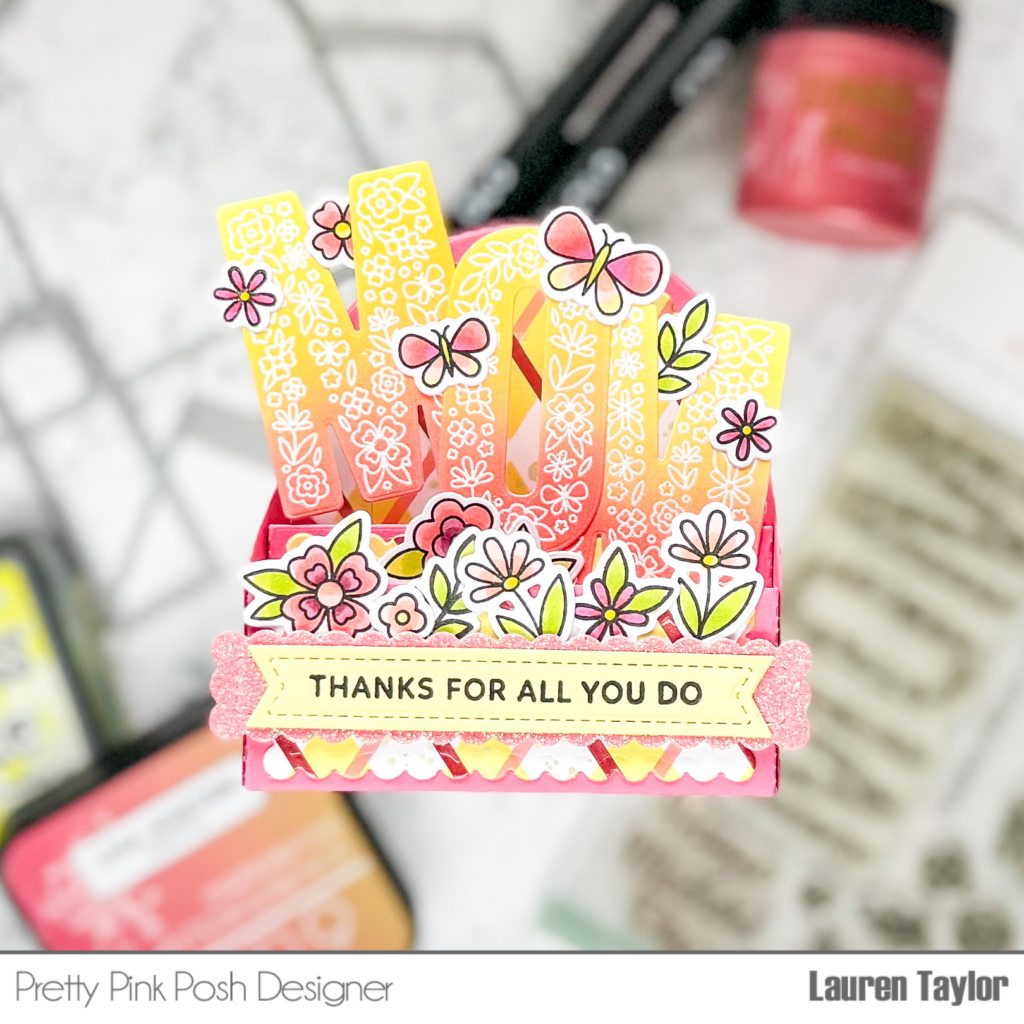
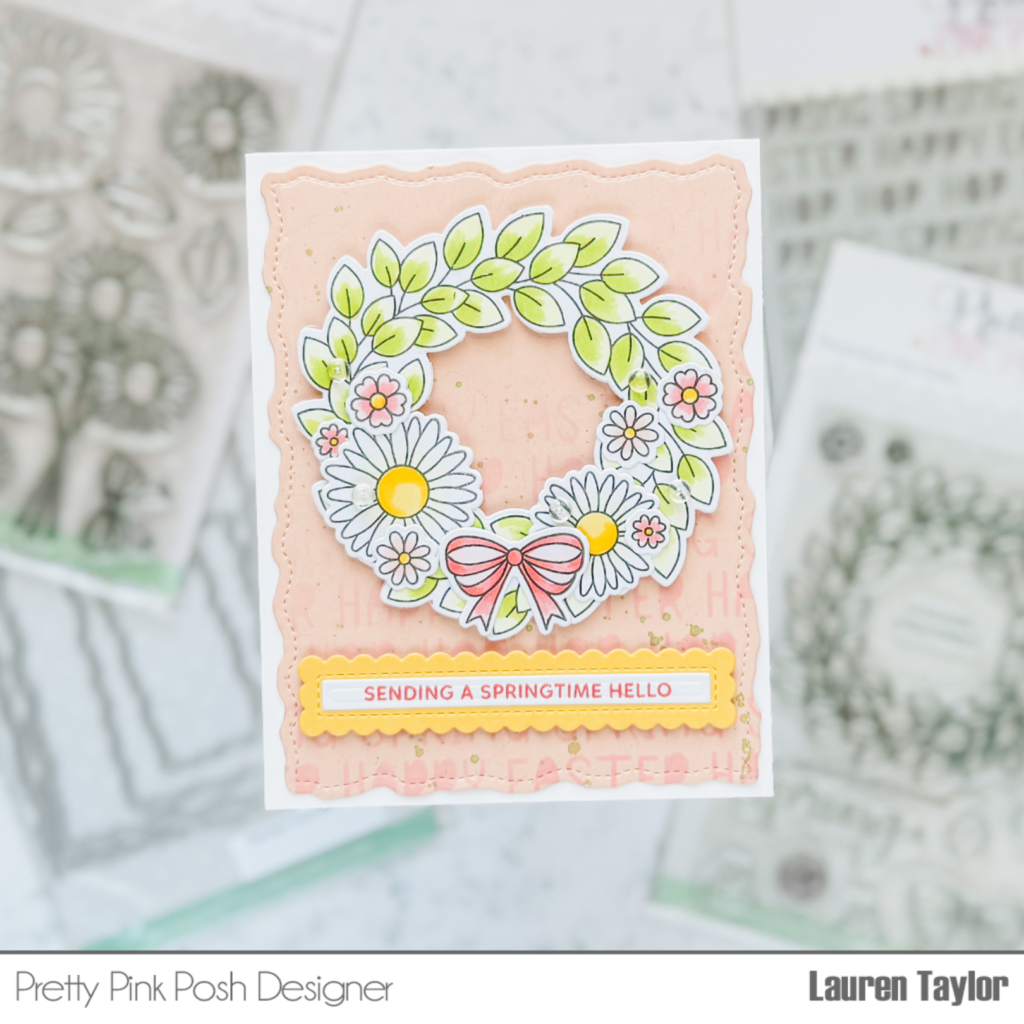
I started with stenciling as I’m using a paste that will need time to dry. Using the Layered Argyle Stencils on white cardstock, I used Squeezed Lemonade Distress Oxide for the (A) stencil, Fruit Salad Summer Interference Ink for the (B) stencil, and Rosy Cheeks Lunar Paste for the (C) stencil.

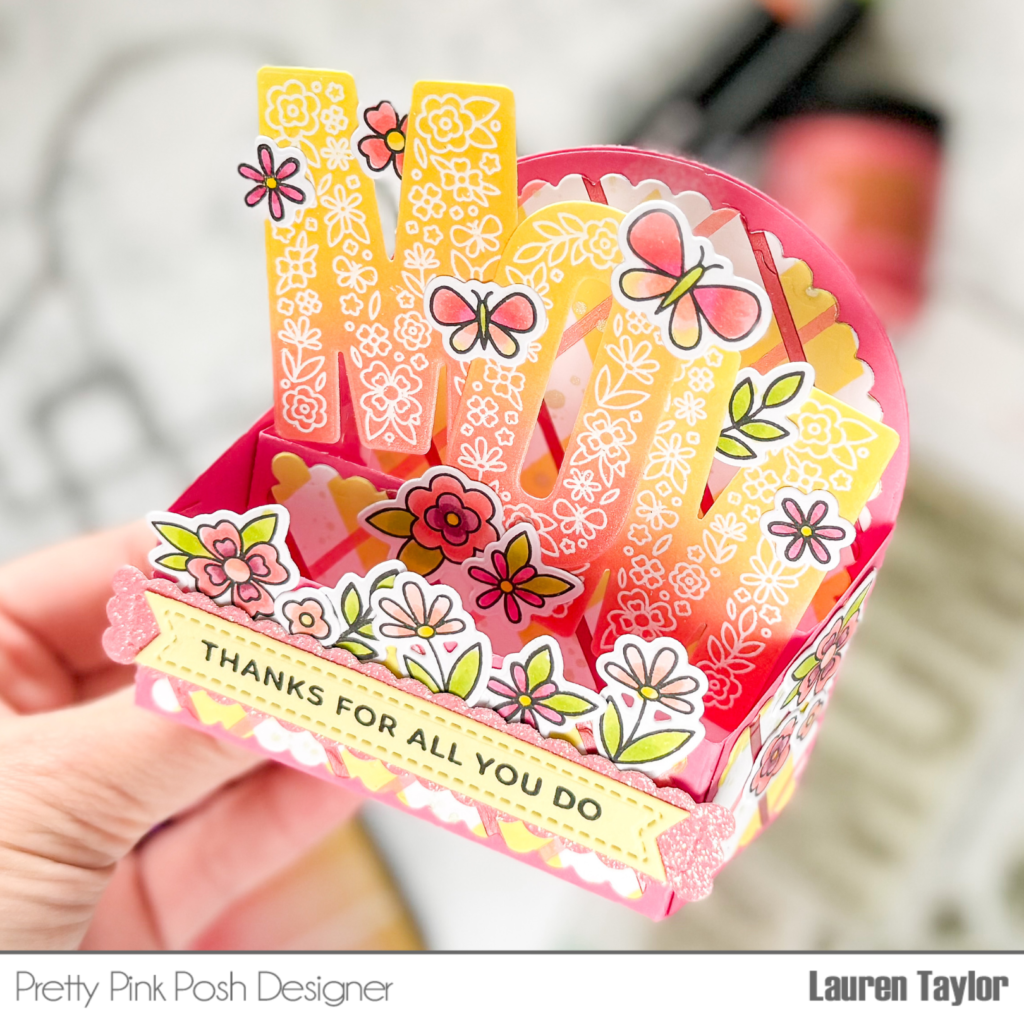
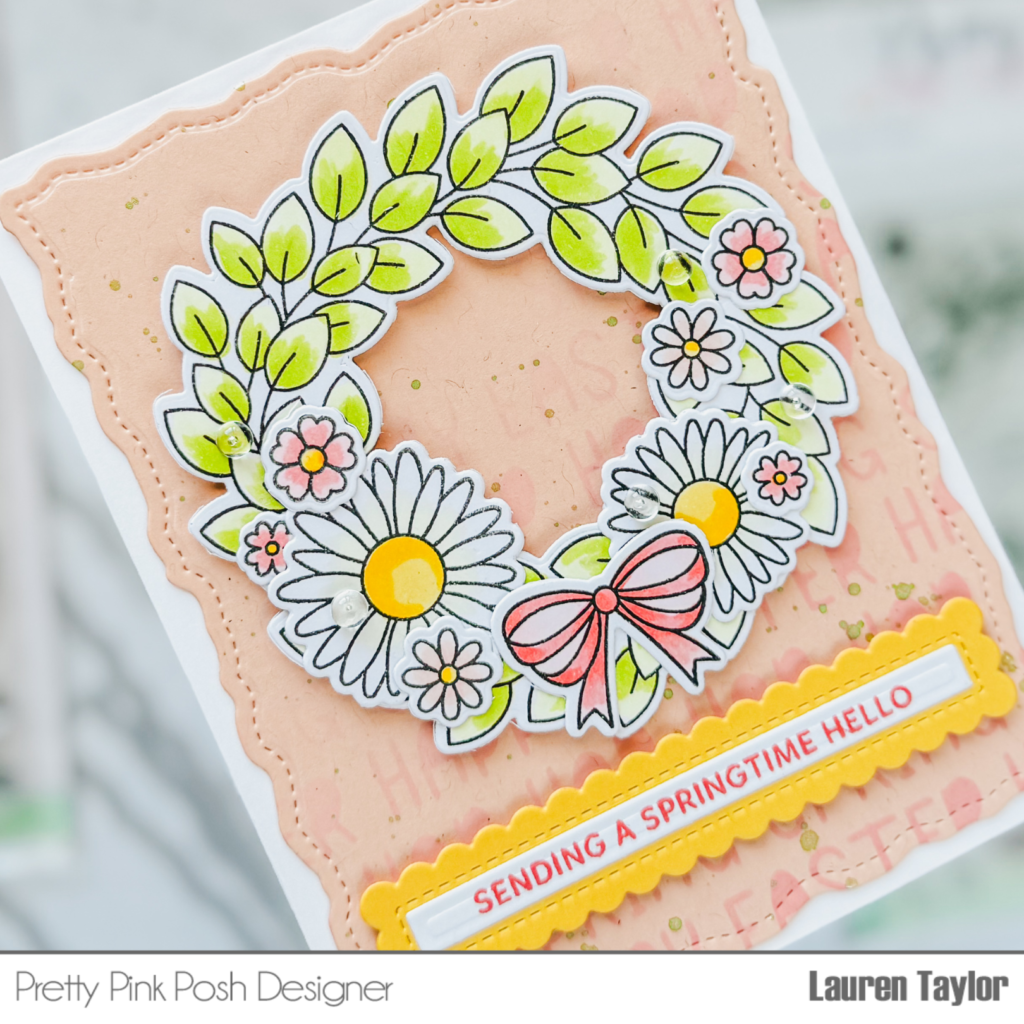
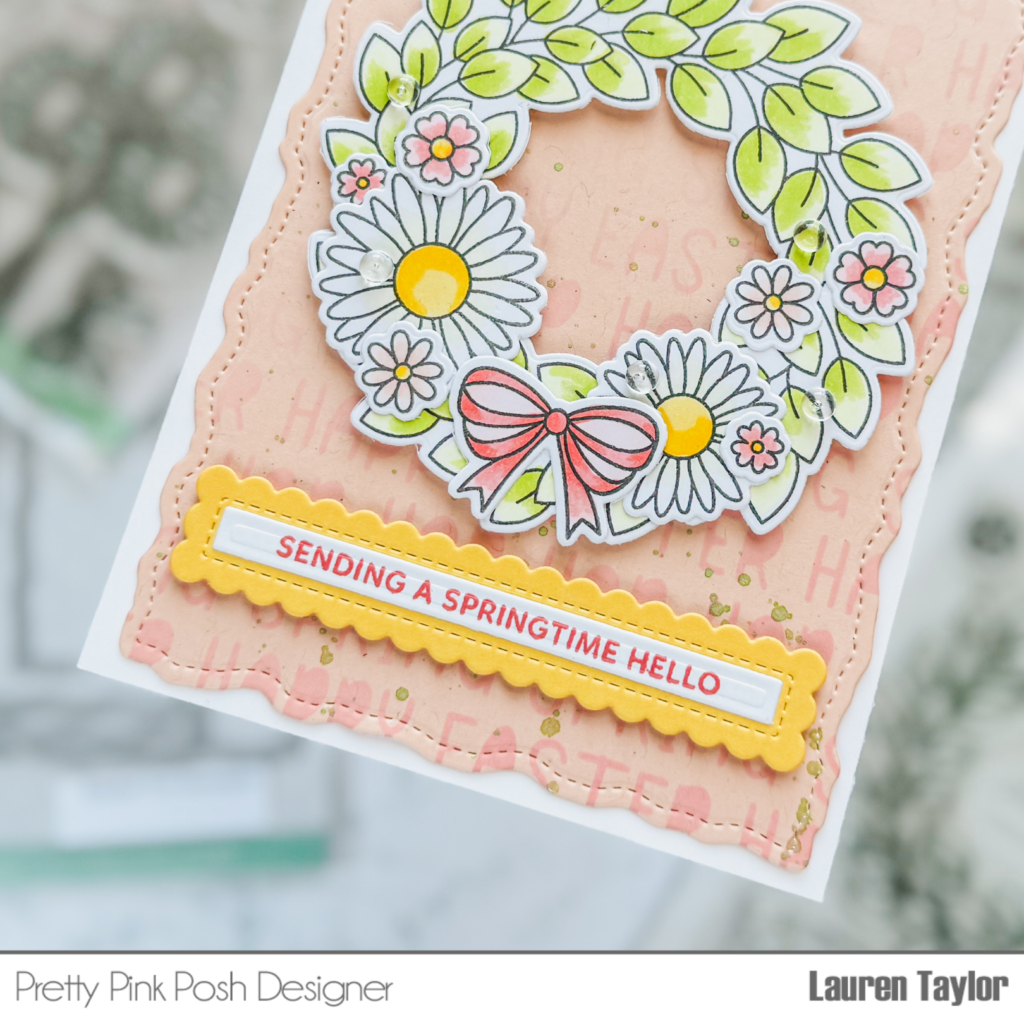
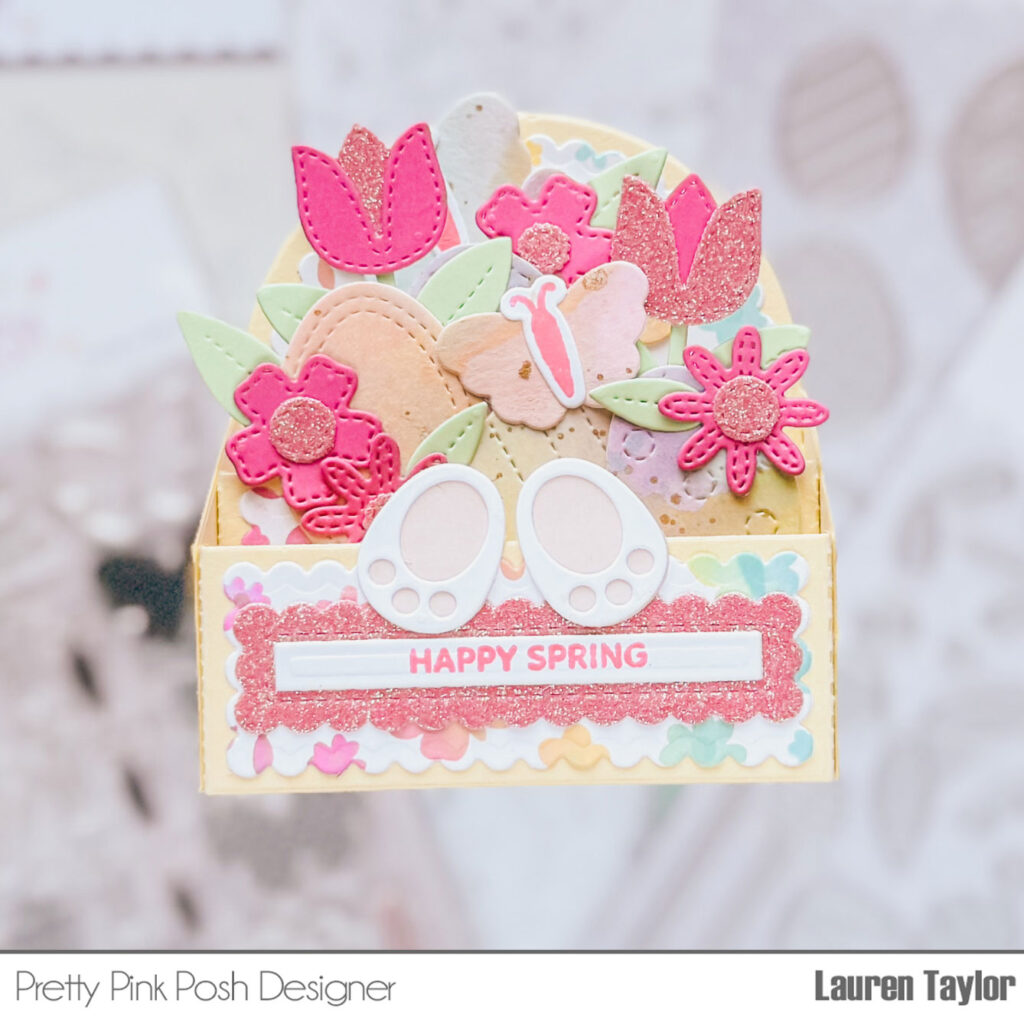
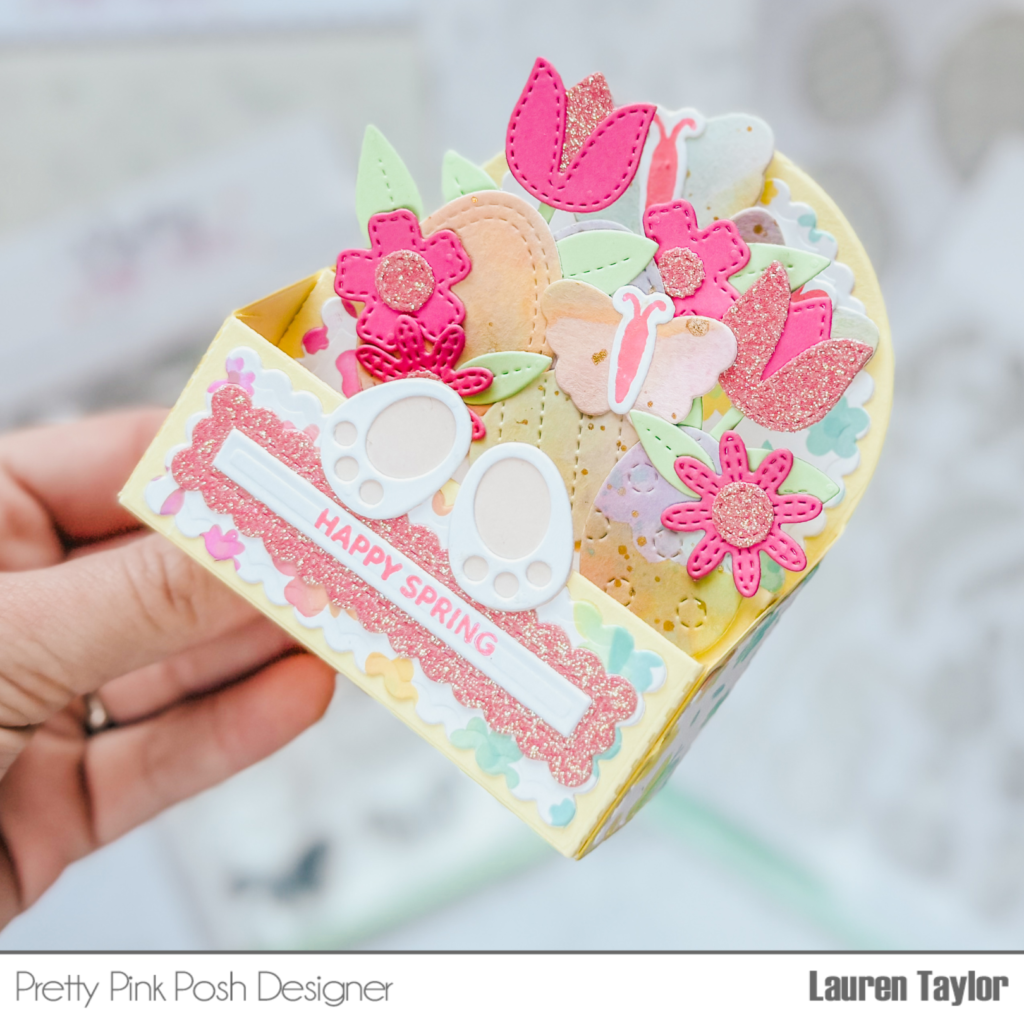
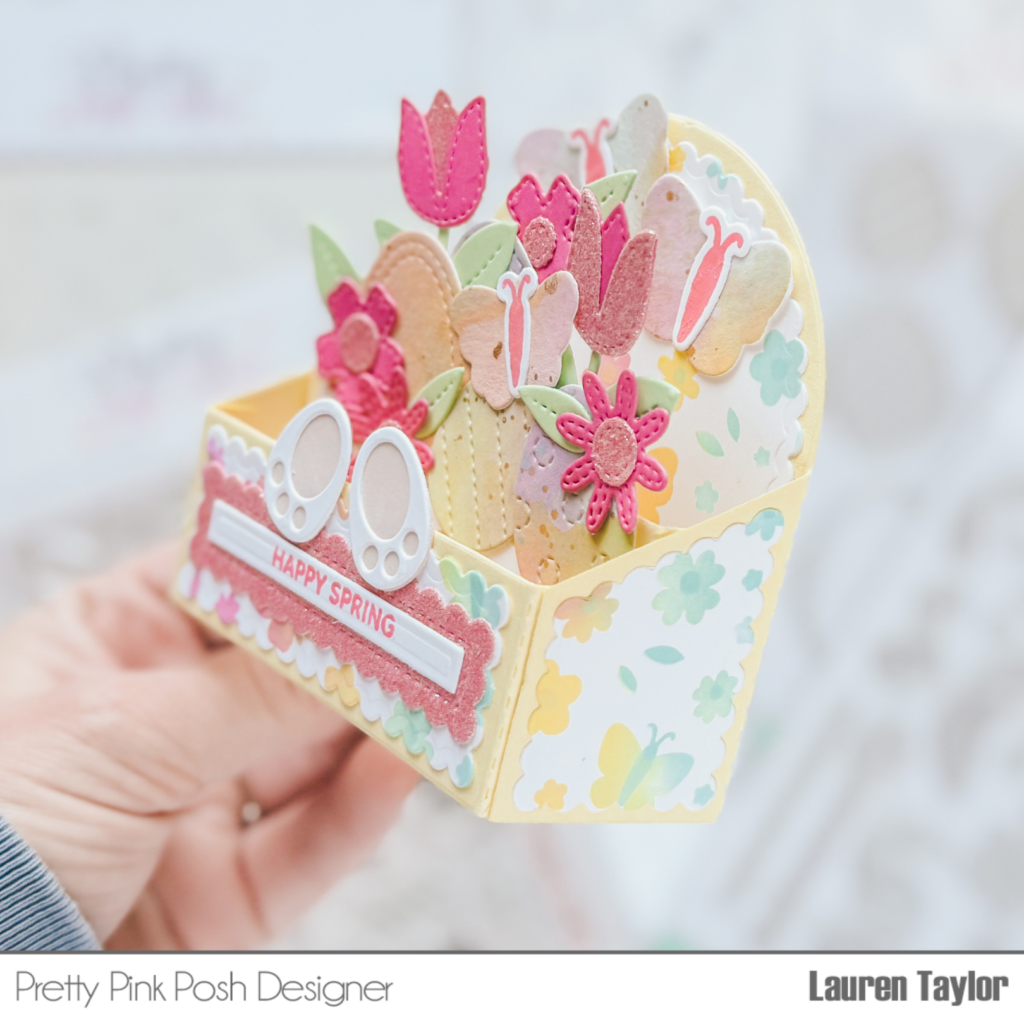
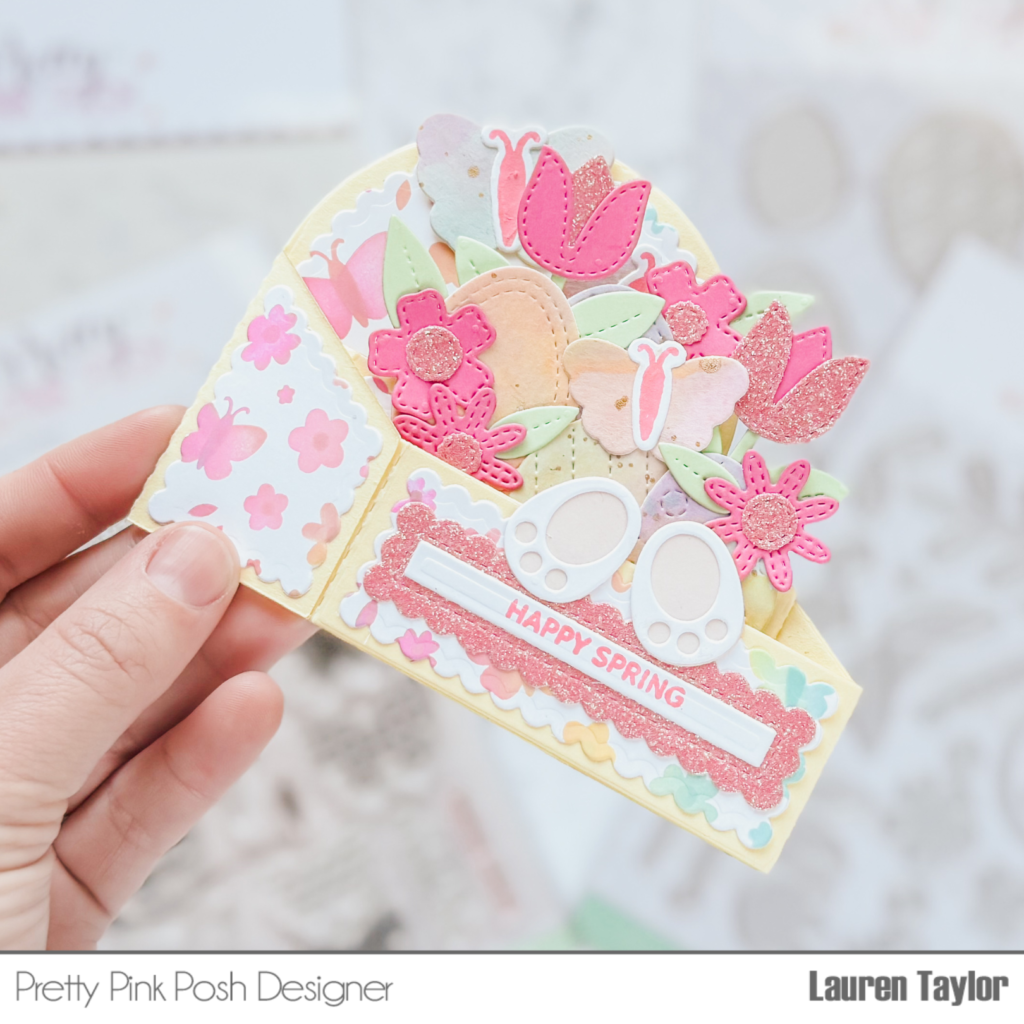
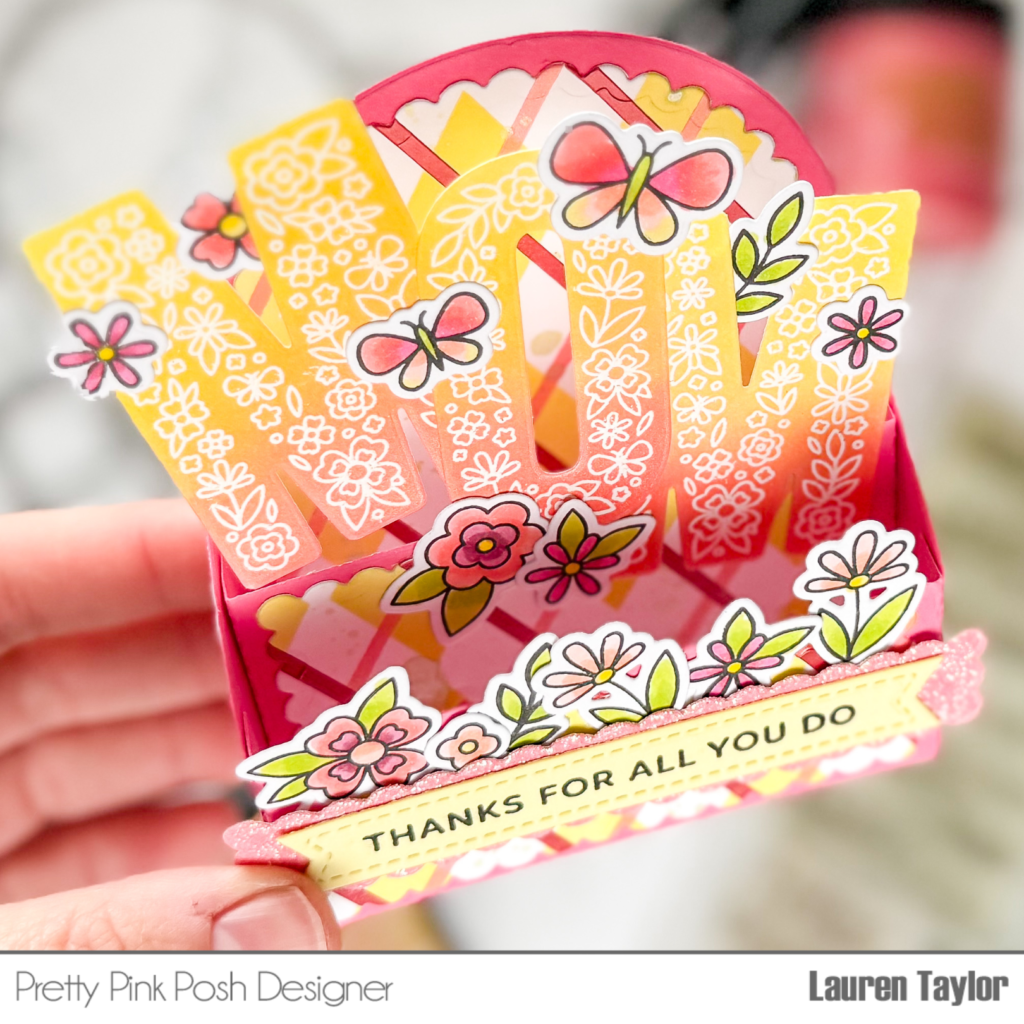
While that was drying, I used the same inks to emboss resist the “MOM” sentiment from the Mom stamp set with white embossing powder. When done, I used the Mom coordinating dies to cut out the word. I also stamped the floral images with an alcohol marker friendly black ink and colored them in with OLO markers. I used their dies to cut them out and will use these images to decorate the box card.

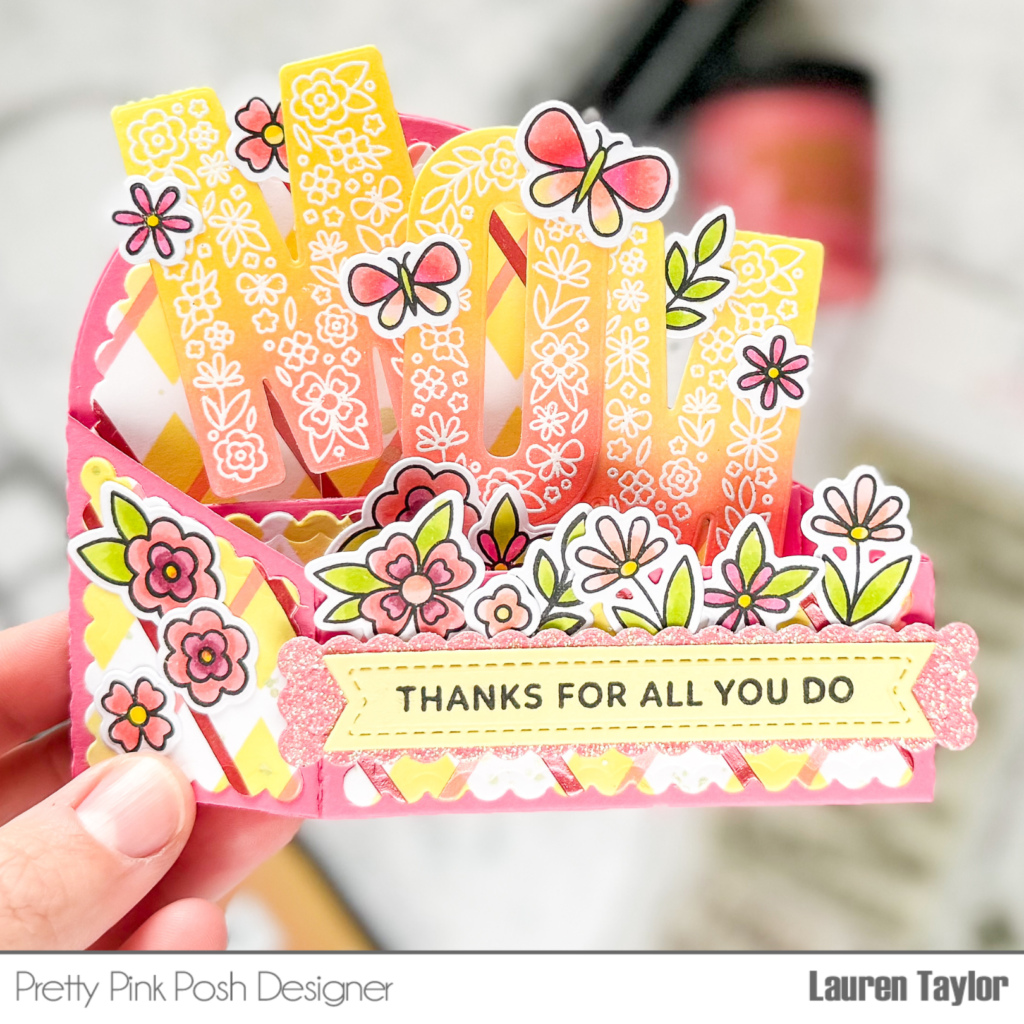
The Scallop Box Card Dies were cut out of pink cardstock for the base and the scallop dies were used with the stenciled background. I adhered the box card together and created my secondary sentiment with pink glitter and yellow cardstocks with the Sentiment Strips Dies. When my sentiment strips were added to the box card, I added my “MOM” and floral images to the box card.

You can follow along in today’s video and I hope you had some floral fun with me today for the Mother’s Day box card. I’m already brainstorming how to make a Father’s Day box card for next month!

| | |

Spring Theme Week: Day 4

**All items in the Spring section are 15% off during theme week**

Hi Crafty Friends! Carly here with a really easy rainbow stamping technique that’s perfect with the Decorative Butterflies stamp set

Watch the video above  I  Watch the video in HD on YouTube

I cannot get enough butterflies this spring and I’m so smitten with the versatility of this stamp set! There are so many possibilities with the shapes and patterns but the solid butterflies also offer a chance to play with fun inking techniques like this one!

Here are the Distress ink colors I used:

  • Carved Pumpkin
  • Picked Raspberry
  • Wilted Violet
  • Mermaid Lagoon
  • Salvaged Patina

Thanks so much for stopping by! I hope you were inspired by this technique and card.

| | |

Mother’s Day Card featuring Die Cuts!

Hi everyone! Rebecca here. One of the many things I love about Pretty Pink Posh dies is that they often cut an adorable image AND faux stitched or pierced lines. Combining different Pretty Pink Posh dies with these additional elements makes creating a pretty Mother’s Day card with tons of interest so quick and easy!

Watch the video above  I  Watch the video in HD on YouTube

Start with the background with the Pierced Leafy Vines Plate Die. Grab a mother’s day sentiment stamp from the Flower Garden stamp set. Stamp the sentiment with plenty of room around it so you can die cut the sentiment with an Eyelet Circles Die.

Use other colors of cardstock to cut out several Stitched Butterflies Dies and flowers from the Spring Mug Additions Dies. Adhere the layers of the flowers together and then pop up the butterflies and flowers around the Eyelet Circle sentiment. Adhere some of your favorite confetti mix to add some shine! And that’s it.

I think you will be amazed when you see how much interest these dies add! Thank you so much for stopping by!

Rebecca

| | |

Two Spring Butterfly Cards + Video

Hello crafty friends. It’s Lisa Mears on the blog today. I’m going to be using the Stitched Butterflies dies from the newest release to make two cards. I knew I wanted my butterflies to have more than one color on their wings so a great way to achieve that look is to do some ink-blending.

If you would like to see how I made my cards, watch my video below or on YouTube.

Watch the video above  I  Watch the video in HD on YouTube

First, I die cut the Stitched Butterflies with Scrapbook.com Mixed Media White Smooth Cardstock. The smooth white cardstock, coupled with the Ranger Distress Oxide inks, made the ink-blending so effortless. The smooth and creamy texture of Distress Oxide ink allows for seamless blending, creating a beautiful gradient from one color to the next one.

The Distress Oxide inks I used for the butterflies in my first card include:

Top Butterfly: Tumbled Glass and Squeezed Lemonade
Middle Butterfly: Kitsch Flamingo and Squeezed Lemonade
Bottom Butterfly: Shaded Lilac and Kitsch Flamingo

I used the Layered Butterfly Floral Stencil for the background of my card. This stencil has a mix of butterflies and flowers which I inked in several different spring color Distress Oxide inks including Shaded Lilac, Kitsch Flamingo, Squeezed Lemonade, Saltwater Taffy, Cracked Pistachio, and Tumbled Glass. I even ink-blended two colors of ink for the butterflies in the stencil using a very detailed ink blending brush to get into the small areas of the stencil. 

I added the sentiment “Happy Spring” from the Sentiment Strips: Easter stamp set and die cut it with the coordinating dies.

For my next card, I used the Pierced Leafy Vines Plate for my card background. I die cut it with Scrapbook.com Mixed Media White Smooth Cardstock and added the following Distress Oxide inks: Saltwater Taffy, Squeezed Lemonade, Cracked Pistachio, and Tumbled Glass.

I added an Eyelet Rectangle die to the top and then added two ink-blended butterflies. I topped it off with a sentiment from the Sentiment Strips: Easter stamp set.

Thanks for stopping by today! Have a great day!
Lisa Mears

| | |

Butterfly Wreath Card + Video

Hi everyone! Rebecca here with a spring themed card! Today I am creating a butterfly wreath! To create the background for this card, I used some light colorful inks on the Layered Floral Vines Stencils.

Watch the video above  I  Watch the video in HD on YouTube

Pretty Pink Posh: Butterfly Wreath Card + Video

To create the butterflies, I used the Decorative Butterflies stamp set to stamp a whole bunch of small, medium and large butterflies. The great thing about this set is that you have the option of creating outlines, solids and patterns and can really play with different color combinations. I stamped and heat embossed several gold butterfly bodies. I then used the Decorative Butterflies coordinating dies to cut out all of the butterflies and their bodies.

Pretty Pink Posh: Butterfly Wreath Card + Video

For the sentiment I used a stamp from the Decorative Butterflies stamp set and stamped it on one of the solid pink butterflies I had created. Then I popped that up on a small Eyelet Circles die cut out of white cardstock. Then I used the Eyelet Circles dies to cut a larger circle to use as the base of my wreath. The sentiment circle went in the center and I popped up the butterflies on the edge of the large circle. First I bent up the wings and then I placed one small foam square in the center of the butterfly to give it even more dimension.

Pretty Pink Posh: Butterfly Wreath Card + Video

I had so much fun creating this spring themed Hello Friend card, but this design and sets could be used for a variety of other cards and would be perfect for a mother’s day card! I hope you’ll try these sets and create your own butterfly wreath with your favorite colors!

Thanks so much for stopping by!
Rebecca

| | |

Spring Daisy Wreath + Video

Hi, friends! It’s Lauren and I am back with a new video today. I felt inspired to combine flowers for a Spring wreath from this year and last year’s Spring releases!

Watch the video above  I  Watch the video in HD on YouTube

Pretty Pink Posh: Spring Daisy Wreath + Video

I started with my background and I had a natural, apricot cardstock in my stash and I did a tone on tone look by blending Saltwater Taffy Distress Oxide with the Easter Words Stencil. After splattering a green, metallic watercolor, I used the largest Stitched Torn Rectangle Die when it was dry.

Pretty Pink Posh: Spring Daisy Wreath + Video

Next I stamped my images with an alcohol marker friendly black ink – I stamped the wreath and small flowers from the Leafy Spring Wreath Stamp Set along with the daisies and bow from the Daisies Stamp Set. I used my OLO markers to color them in and you can see the colors in my video today.

When I was done coloring, I used the Daisies Coordinating Dies and Leafy Spring Wreath Coordinating Dies to cut all of the images out. I planned out my wreath and adhered the flower and bow to the wreath with liquid adhesive. I used foam adhesive to attach my wreath to the stenciled panel.

Pretty Pink Posh: Spring Daisy Wreath + Video

I had a yellow, scalloped Sentiment Strip Die cut from another project and was happy it matched the yellow of my flowers! I cut another strip from white cardstock and stamped my sentiment from the Sentiment Strips: Easter Stamp Set with pink ink. I layered the die cuts together and popped it up on my panel with foam adhesive as well.

The panel was attached to my card base and I added a few 4mm Clear Droplets on the wreath to give it some subtle shine and a dewy look! I hope you enjoyed today’s card – I’m so inspired by the apricot, pink, green and yellows… Beautiful colors for Spring!

| | |

Butterfly Garland Surprise Card

Hi Crafty Friends! Carly here and I can’t wait to share my latest card with you! It’s got butterflies, rainbows and a surprise inside…perfect for spring!

Watch the video above  I  Watch the video in HD on YouTube

The Stitched Butterflies die set on the card front make for a cute, clean & simple card! But the butterflies also look amazing adhered together and hidden inside for a rainbow surprise!

The interactive element is so easy to do and can easily be customized to make your card more or less dimensional. 

Thanks so much for stopping by!

| | |

Easter Box Card + Video

Hi, friends! It’s Lauren and I am back with a new video on the Pretty Pink Posh YouTube channel today. I’m continuing my collection of making holiday themed box cards with Spring and Easter!

Watch the video above  I  Watch the video in HD on YouTube

I started with die cutting the Scallop Box Card Dies out of yellow cardstock for the base pieces and smooth, white cardstock for the scalloped pieces to do some ink blending. I used the new Layered Butterfly Floral Stencils with Distress Oxides in Picked Raspberry, Saltwater Taffy, Salvaged Patina, and Squeezed Lemonade to create the design on the scalloped die cuts. I assembled the Scallop Box Card base together and added the stenciled scalloped pieces to the panels.

Pretty Pink Posh: Easter Box Card + Video

Using a large piece of watercolor cardstock, I used the same Distress Oxides to ink squish and blend all the colors to give a watercolor look. I also splattered on gold watercolor for some sparkle! When it was dry, I used the Stitched Eggs Dies and Decorative Butterflies coordinating dies to cut out eggs and butterflies. I die cut as much as I could out of the panel, but only a used a few for today and I’ll save the rest for a future project.

Pretty Pink Posh: Easter Box Card + Video

For the butterflies, I also stamped the bodies from the Decorative Butterflies Stamp Set with a pink ink and used the coordinating dies to cut them out. I glued them to the center of the butterfly die cuts from the watercolor cardstock. I also cut the bunny feet and flower stem from the Big Easter Cupcake Dies, strips from the Sentiment Strips Dies, and flowers and leaves from the Spring Mug Additions Dies.

Pretty Pink Posh: Easter Box Card + Video

I glued all of the layering dies together and created a scene on the shelf piece of my box card with the eggs, butterflies and flowers. I love the softness of the eggs and bright pink of the flowers! I stamped my sentiment from the Decorative Butterflies stamp set onto my die cuts and added the sentiment to the front of the box card. My little bunny feet are sticking up above the sentiment and they’re my favorite part of the box card!

Pretty Pink Posh: Easter Box Card + Video

Box cards have been so fun to make and I love having my Valentine, St. Patrick’s Day and now Easter box cards on my desk! I’d love to know what I should make for May – probably something for Mother’s Day? What would you like to see?!

| | |

Party Balloons + Video

Hi, friends! It’s Lauren and I am back with a new video today. I was inspired by some birthday patterned paper I had in my crafty stash to make colorful balloons on a birthday card!

Watch the video above  I  Watch the video in HD on YouTube

I started with die cutting the Pierced Stars Plate Die from a piece of confetti patterned paper to be the background of the card. Then I cut out different pieces from the Party Balloons Dies to make six different balloons – the traditional and star balloons. I layered different pieces together to create a striped, star balloon and a balloon with star details. There are also balloons cut from holographic paper to create the look of mylar balloons!

Once the balloons were ready, I also had the balloon strings from the Party Balloons Dies in a dark blue cardstock, I layered them with liquid glue and foam adhesive in 1mm and 2mm thicknesses on to the Pierced Stars background.

My sentiment is stamped from the Birthday Train Stamp Set to create “Hooray It’s Your Day”. I stamped “Hooray” on white cardstock in blue ink and used the Birthday Train Coordinating Die to cut it out. “It’s Your Day” is stamped in the same blue ink on cardstock cut into a banner from the Sentiment Strips Dies.

I added the sentiments to the card, under the balloons, with foam adhesive to finish the card! I hope you enjoyed today’s process video for a fun and relatively quick and easy party card.

| | |

Lucky Shamrocks Box Card + Video

Hi, friends! It’s Lauren and I am back with a new video today. Last month I made a Valentine’s Day Box Card and I was inspired to create one for St. Patrick’s Day as well!

Watch the video above  I  Watch the video in HD on YouTube

I started with all of my die cutting of the Scallop Box Card Dies and Stitched Shamrocks Dies from different shades and paper types of green cardstock. My Scallop Box Card base was die cut from a solid green cardstock, the scalloped pieces from white cardstock, and the Stitched Shamrocks from a mix of glitter, shimmer and solid light green cardstock.

Lucky Shamrocks Box Card + Video

Using the Layered Shamrocks Stencils, I ink blended different shades of green ink using the Pinkfresh Studio Over the HIlls Ink Cube Bundle onto the scalloped die cut pieces from the Scallop Box Card Dies. Once I was happy with the shamrocks, I also splattered on some metallic gold watercolor and set them aside to dry.

Lucky Shamrocks Box Card + Video

Next I colored in the pot of gold, gold coin, rainbow and shamrocks from the Lucky Stamp Set with alcohol markers, then used the Lucky Coordinating Dies to cut them out. I also stamped the “Lucky” sentiment and solid shamrocks in dark green ink on white cardstock, and “You’re So” with the same ink on a Sentiment Strip cut from light green cardstock.

Lucky Shamrocks Box Card + Video

After assembling the Scallop Box Card together, I layered in the Stitched Shamrocks, stamped images from the Lucky Stamp Set, and a few clay shamrocks from the Lucky Charms Clay Confetti. My sentiment was layered onto the front of the Scallop Box Card with a Sentiment Strip banner behind the “You’re So Lucky”.

You can watch my process in today’s video; I hope you enjoyed this card and I am already brainstorming how I can make an Easter Box Card next month!