Tutorials

| | |

Tree Cover Plate w/ Distress Mica Sprays

Hi, friends! It’s Lauren and I am back with a new video today making a Christmas shaker card! I love how easy shaker cards can be with the new Tree Cover Plate Die and we’re going to make one together today.

Watch the video above  I  Watch the video in HD on YouTube

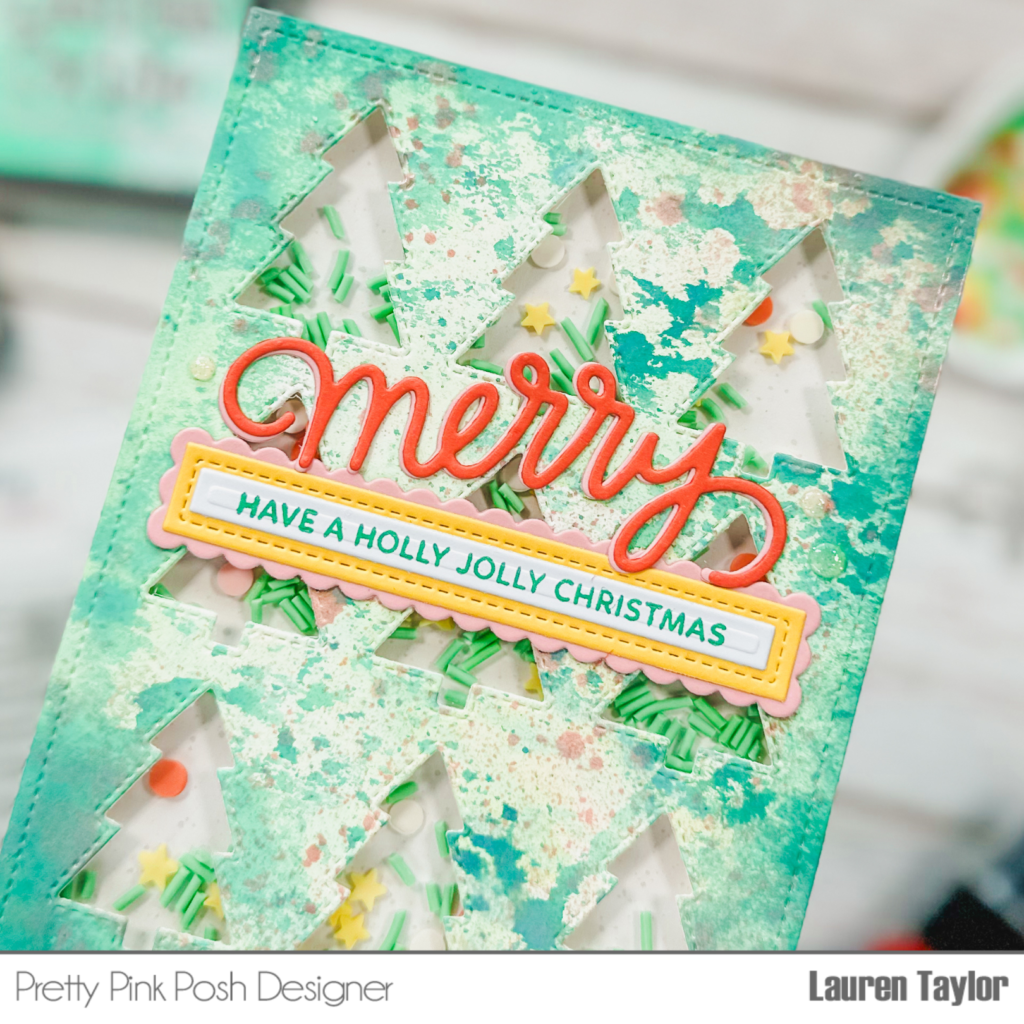
I am starting with some watercolor cardstock and adding different Distress products to create my own colorful paper. Using Cracked Pistachio Distress Oxide, I ink squished the color on my glass mat and added water. I dabbed my paper into the ink and used my heat gun to dry the paper in between layers. Once I was happy with the lighter green, I also added some Lucky Clover Distress Oxide.

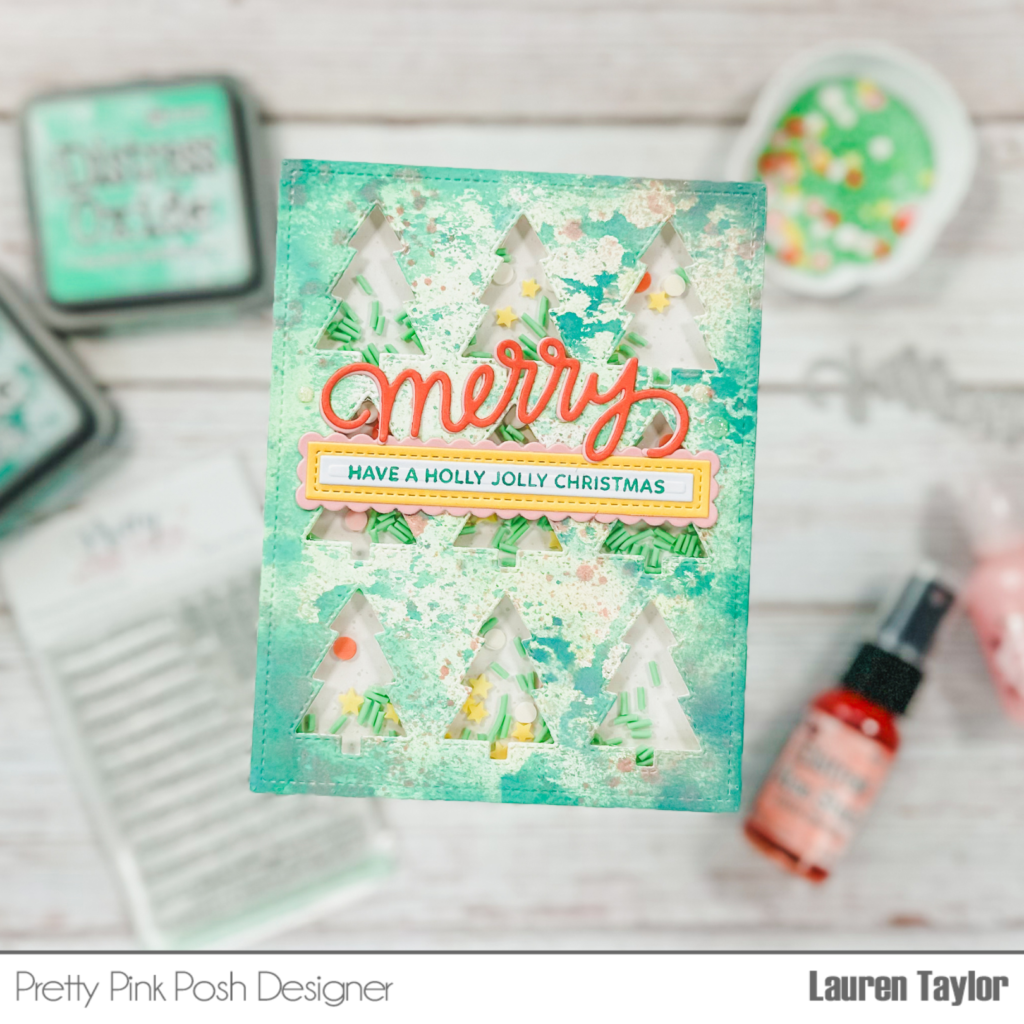
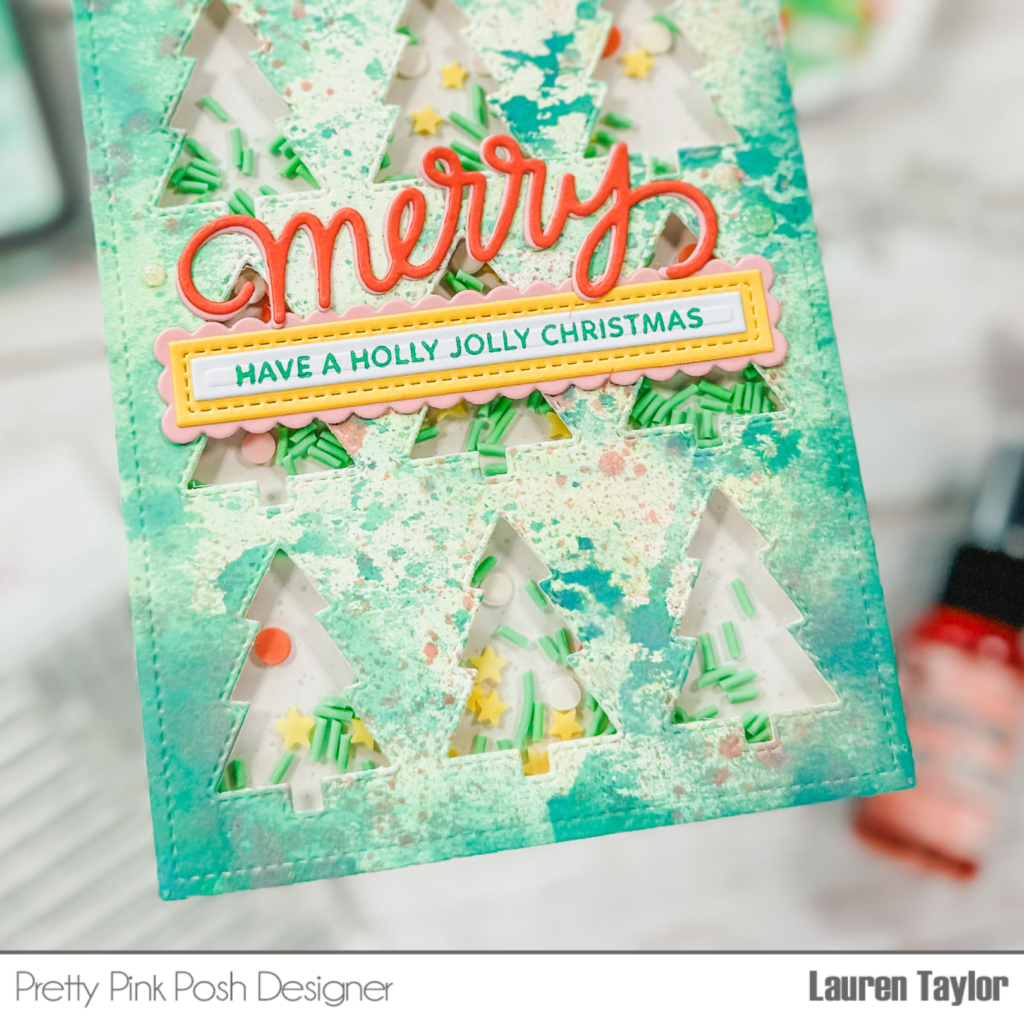
The green was looking so pretty, but I wanted to tie in some pink to match the Christmas Tree Mix, so I sprayed on some Distress Mica Spray in Sugary Gumdrop. Once the watercolor cardstock is dry, I used the Tree Cover Plate Die to cut out my panel for the front of my shaker.

You can watch the video below to see each step of the shaker assembly, but I layered the Tree Cover Plate with acetate, foam adhesive and a white and gray speckled background paper. This panel will be attached to an A2 card base.

For my sentiment on the card, I am mixing dies and stamps – I used the Merry Script to die cut out of a dark and light pink cardstock and glued them together to create a drop shadow look. I also stamped a sentiment from the Sentiment Strips: Christmas Stamp Set in green on die cuts from the Sentiment Strips Dies. I layered the stamped sentiment on white with yellow and pink cardstock.

Since my card already has plenty of dimension being a shaker card, I adhered my die cut and stamped sentiments to the card with liquid adhesive.

I hope you like this interactive Christmas card inspired by the colors of the Christmas Tree Mix and that you have lots of fun making cute Christmas cards with this latest release!

| | |

4 Seasons on 1 Card + Video

Hi everyone! Rebecca Keppel here today with an EASY fun fold and a card with all 4 seasons of the Fruit Tree Dies represented! It’s much easier to understand just how easy this fold is when you see it in action, so be sure to check out the video.

Watch the video above  I  Watch the video in HD on YouTube

4 Seasons on 1 Card + Video

I saw Jennifer McGuire create this super easy fun fold YEARS ago and remembered it when I was trying to figure out how I was going to add all 4 seasons of different trees on one card. Basically you cut two A2 side folding cards and adhere them together. That leaves you with two outer panels and two inner panels that all fold up into one A2 card. And it gives you a place to put four different card panels on one card!

4 Seasons on 1 Card + Video

I used the Fruit Tree Dies to create a spring, summer, fall and winter tree with the different seasonal fruits on them. Each panel got a small sentiment from the Fruit Salad stamp set or Citrus stamp set.

4 Seasons on 1 Card + Video

In the center of the card is a place for your greeting and a larger sentiment. I used the Get Well Soon stamp set that says Sending Love and Hugs.

The Fruit Tree Dies are so versatile and make a great image on your card whatever the season, but I hope you’ll give the four season card a try!

Thanks for stopping by!
Rebecca

| | |

Halloween Theme Week: Day 7

Halloween Theme Week: Day 7

**All items in the Halloween Section are 15% off during theme week!

Hey Friends! It’s Mindy with you today to share a really fun ink blending technique to create this spooky sky for your Halloween cards. 

Watch the video above  I  Watch the video in HD on YouTube

Halloween Theme Week: Day 7


The main products I’ll be using for my card are Spooky Sky StencilBoo To You stamp set and Ghost Shaker die set.

Halloween Theme Week: Day 7

The biggest tip I can give when it comes to ink blending is to start with colored cardstock. It will make the process so much easier! 

Be sure to check out the video for all the tips and hope you enjoy the technique. It’s a fun one! 

| | |

Halloween Theme Week: Day 5

Halloween Theme Week: Day 5

Hi friends, it’s Carly here. Are you looking for a fun way to give some Halloween treats this year? Maybe some Halloween happy mail? Well I think I have an idea to help and there’s also a video tutorial!

**All items in the Halloween Section are 15% off during theme week!

Watch the video above  I  Watch the video in HD on YouTube

Halloween Theme Week: Day 5

I adore making pinata-style cards! It is so fun to send a handmade card that has an extra surprise inside! 

Halloween Theme Week: Day 5

Products used:

Pumpkin Shaker
Boo Shaker (for Jack O’Lantern face)
Sentiment Strips Halloween (for front sentiment & pull-tab)
Boo To You (for stamped shaker bits)
Candy Corn Shaker Beads

Halloween Theme Week: Day 5


Thanks so much for stopping by! Hugs & Happy Halloween!
Carly

| | |

Mixing Old & New Fall Stamps

This is part of the Instagram Hop. If you’d like to hop along for more inspiration and a chance to win a gift card, visit us on the Pretty Pink Posh Instagram account.

Hi, friends! It’s Lauren and I am back with a mix of older and new Fall themed stamps! I love that the new products work so well with previously released stamps so you can bring in what you already have in your crafty stash with your new products.

Watch the video above  I  Watch the video in HD on YouTube

Mixing Old & New Fall Stamps

As always, we’re starting with our stenciling because I’ll be using some stenciling paste and I want to make sure our background has plenty of time to dry. I used a panel of woodgrain cardstock trimmed to 4×5.25” and blended on Ground Espresso Distress Ink through the Deco Leaves Stencil. When I was happy with the color, I cleaned off the stencil and added some stencil paste – this one is called Overheated Solar Paste.

Mixing Old & New Fall Stamps

While the background is drying, I stamped the images I wanted to use from the Autumn Wreath stamp set and Fall Jar stamp set with a brown ink that is alcohol marker friendly using a MISTI. I used my Ohuhu Art Markers to color them in and then put them back in the MISTI to stamp the images again with Pinecone VersaFine Clair. Since I kept the stamps in the same spot, I now have a vibrant, brown outline to all of my images and I just LOVE how they look.

Mixing Old & New Fall Stamps

I used the Autumn Wreath coordinating dies and Fall Jar coordinating dies to cut out all of my images and by now my background is dry and we’re ready to assemble. I added the background with a tape runner to the center of my A2 card base in white cardstock. I glued down my wreath with liquid adhesive and added my jar with foam adhesive. I layered in the rest of the images with a mix of liquid adhesive and foam adhesive to give everything some dimension!

Mixing Old & New Fall Stamps

I’m so ready for Fall to get here! I’m pretending with my crafting and drinking Pumpkin Spice Latte, but these images are just so perfect for the upcoming season. I hope you liked this card and remember to check out the video to see all the details of the card come together!

Lauren

| | |

Fall Cornucopia + Video

This is part of the Instagram Hop. If you’d like to hop along for more inspiration and a chance to win a gift card, visit us on the Pretty Pink Posh Instagram account.

Hello crafty friends. It’s Lisa Mears on the blog and today I’m sharing a card using the new Fall Cornucopia die set with you all.

Watch the video above  I  Watch the video in HD on YouTube

I used the Fall Cornucopia die set. This die set includes the basket and lots of fruits and vegetables to add to the basket. I die cut all of the pieces and added some ink to edges to add depth. 

Fall Cornucopia + Video

For the background of my card, I used the Layered Foliage Stencils. This stencil consists of fall leaves. I added a light brown ink to the stencil and then added the same ink to the edges of the cardstock. I wanted a very subtle background since the cornucopia would be the focal point of the card. 

Fall Cornucopia + Video

For the sentiment, I used the Sentiment Strips – Fall stamp set and die cut it with the coordinating Sentiment Strips dies.

Thank you so much for stopping by today. Have a great day!
Lisa Mears

| | |

Mini Halloween Notecards

Hi, friends! It’s Lauren and I am back with a new video with some cute mini notecards for Halloween! I love the idea of having something non-treat related for the holiday and these tiny shaker cards are perfect for such occasions.

Watch the video above  I  Watch the video in HD on YouTube

Mini Halloween Notecards

Before starting the video, I cut my Mini Scallop Card Dies with some orangey-pink cardstock and made shaker frames with black cardstock and a generic nested square that fit nicely inside the stitched square in the die set. I start with making the background since it needs the most time to dry. Using white cardstock, I stenciled the Spooky Sky Stencils with Distress Oxides (Lost Shadow for the clouds and Black Soot for the bats) and stencil paste. I used yellow to make the stars pop!

Mini Halloween Notecards

While the background was drying, I stamped and colored my Halloween Signs stamp set images with alcohol markers. I used the Halloween Signs coordinating dies to cut them out. With black ink, I stamped different sentiments into the signs and they are just the cutest! My background was dry enough so I splattered on some purple metallic watercolor and trimmed them down to just slightly smaller than 2.5×2.5”.

Mini Halloween Notecards

I assembled the shaker panels with acetate and thick foam tape, you can see each step in today’s video! I then adhered the panel to my orangey-pink mini cards as well as white square on the inside with a Halloween sentiment stamped in purple.

I hope you like these mini notecards and they inspire you to make some cute mini cards for Halloween!

| | |

Slimline Halloween Cupcakes

Hello friends. It’s Lisa Mears here and today I’m sharing a Halloween card I made using some fun new Halloween products from Pretty Pink Posh.

Watch the video above  I  Watch the video in HD on YouTube

Slimline Halloween Cupcakes

I stamped the cupcakes from the Halloween Cupcakes stamp set onto Bristol Smooth cardstock and I colored them using Zig Clean Color Real Brush pens in the following colors: Deep Violet, Black, Light Green, FL Green, Orange, Light Gray, Deep Brown, and Sugar Almond Pink. I used a water brush to blend the colors to get a shaded look. When I finished coloring, I die cut the cupcakes with the Halloween Cupcakes coordinating dies.

Slimline Halloween Cupcakes

For the background of my card, I cut an 8 1/4” x 3 1/4” piece of Bristol Smooth cardstock and applied Twisted Citron Distress Oxide ink to the entire panel. I added Mowed Lawn Distress Oxide ink to the edges. Next, I used the Layered Spider Webs stencil and stenciled the spider webs in Hickory Smoke Distress Oxide ink. I added some Sheer Shimmer Spritz to the background and applied a paper towel over it to pick up some of the ink and to add a little shine.

Slimline Halloween Cupcakes

I used the Stitched Border 1 dies to add the purple and orange borders and then added all six Halloween cupcakes in a row. Finally, I added a sentiment from the Sentiment Strips: Halloween stamp and die set.

Thank you for stopping by today. Have a spooktacular day!
Lisa Mears

| | |

Halloween Shaker w/ Stamps, Dies and Stencils!

Hi, friends! It’s Lauren and I am back with a new video today with a shaker card inspired by the Candy Corn Glass Shaker Beads! I think the orange, yellow and white (with some black) are the iconic Halloween colors and I wanted to use some of my favorite images from the latest release on this card, too.

Watch the video above  I  Watch the video in HD on YouTube

Halloween Shaker w/ Stamps, Dies and Stencils!

I started with die cutting my background with the largest Wonky Stitched Rectangle Die and the pumpkin from the Boo To You coordinating dies to create my shaker window. To use the emboss resist technique, I stenciled on my spider web layer of the Layered Spider Webs Stencils with embossing ink and used clear embossing powder on the wonky rectangle. I also added the pumpkin stamp from the Boo To You stamp set with black ink and clear embossing powder to the pumpkin cut out.

Halloween Shaker w/ Stamps, Dies and Stencils!

Now that the embossing is done, I added inks in the color scheme of a candy corn! I started with Mustard Seed Distress Oxide on the bottom right, then blended into Carved Pumpkin Distress Oxide and finally a little touch of Picket Fence Distress Ink. I buffed off the ink from the embossing powder and then added a little bit white gold metallic watercolor splatter. The final touch of stenciling is adding in the spiders to my wonky rectangle with the second stencil from the Layered Spider Webs Stencils with a black stencil paste.

While my spiders are drying, I moved on to die cutting some of my favorite images from the Halloween Mug Additions Dies out of scrap cardstock in kraft, yellow, orange, white and black. I added a little ink to my white pumpkin and yellow hat belt, but I assembled them together with such ease and they are so cute! I also stamped my Boo To You stamp set sentiment with embossing ink and white embossing powder onto black cardstock.

Halloween Shaker w/ Stamps, Dies and Stencils!

Once my background was dry, I assembled my shaker together and added the Candy Corn Glass Shaker Beads and you can see each detailed step in my video today. The pumpkin was adhered to a spider web patterned paper, I created my well around the pumpkin, added the Candy Corn Glass Shaker Beads and closed it with the spider web wonky rectangle panel that also has acetate.

Next I added my die cut images and sentiment around the shaker window as well as some yellow clay confetti circles from the Clay Confetti Wheel #4 for some little, final touches. I hope you enjoy this shaker card and you’re having so much fun with the latest release!

| | |

Pink Ghost Shaker

Hi crafty friends! Rebecca here today to share a fun Halloween shaker card! This shaker card is made with the Ghost Shaker Dies and is so fun because it is made with non traditional colors.

Watch the video above  I  Watch the video in HD on YouTube

Pretty Pink Posh: Pink Ghost Shaker

The Ghost Shaker Dies come with everything you need to cut the base of the ghost, the shaker frames and the acetate shaker window. I cut my ghosts out of pink cardstock for a fun look, but if pink is not your thing, you can use any color you like for your card. I filled my shaker with the Ghostly Friends Clay Confetti which includes black and white ghosts, hearts, sprinkles and more.

Pretty Pink Posh: Pink Ghost Shaker

The Ghost Shaker Dies even comes with small dies for the eyes and mouth for your ghost and a boo script sentiment. I used all of those to complete the two flat ghosts and the one shaker ghost. And for a fun touch, I added two of the hearts from the Ghostly Friends Clay Confetti on each ghost to make a bow! This cute die set literally has everything you need to make fun, whimsical Halloween cards with no need for stamping!

Have a BOOtiful day!
Rebecca